Customer Management
Viewing Customers
Go to Customers & CRM → Customers. The list shows 50 people a page, newest first, with their email, phone, role, number of orders and the date they joined.
- Customers (the default tab) lists everyone with a customer account at your store, plus anyone who ordered before accounts were linked. Staff lists owners, admins and staff
- Search finds people by name, email or phone number
- Add User adds a person by hand as a Customer, Staff or Admin
- Customers who came in through an import carry an Imported badge; Imported only shows just them
- Click a name to see their details: phone, address, notes, customer groups, newsletter status, orders and purchases
- Remove takes a person off your store. Their Kaniva login stays (they may shop at other Kaniva stores), but your store's profile and notes on them are deleted, along with the newsletter and CRM entries an import added for them
- Edit changes a person's name, email or password only when their Kaniva account is used at your store alone. Someone who also shops at another Kaniva store (or whom an import linked from an existing account) manages those themselves; you can still change their role at your store
Import customers
Bring your customer list over from Shopify, WooCommerce or a spreadsheet. On Customers & CRM → Customers, click Import customers. Each customer gets an account at your store, and nobody is emailed during the import.
- Pick the tab for where your customers are now:
- Shopify: in Shopify go to Customers → Export, choose All customers and a CSV format, and download
customers_export.csv. Older and newer Shopify exports both work - WooCommerce: go to WooCommerce → Customers → Download, or use your export plugin's customer export. Kaniva uses the shipping address when there is one, otherwise the billing address
- Kaniva spreadsheet: click Download the template and fill in one customer per row. Only
emailis required.tagstakes a comma-separated list, andaccepts_email_marketingshould sayyesonly for customers who agreed to hear from you
- Shopify: in Shopify go to Customers → Export, choose All customers and a CSV format, and download
- Upload the file. You'll see a preview first, and nothing changes until you click Import. The preview shows:
- New to your store: customers who will be added. Someone who already has a Kaniva account from shopping at another Kaniva store is linked to your store, and their own name, password and addresses stay as they are. For their privacy, the preview doesn't say which customers those are, and until they sign in or order at your store you see the details from your file rather than their account's
- Already your customers: only gaps in your store's profile and their groups are filled in. Staff and admins in the file keep their role
- Skipped rows: no email, an invalid email, or the same email twice (the two rows are merged into one)
- how many customers will join your newsletter and which customer groups will be created
- Click Import N customers. The import runs in the background, so you can leave the page. Big lists (more than 5,000) are fine; they just take longer
What comes across:
- Name, email, phone, company, default address and notes. Each customer's notes also say when they were imported, and their order count and total spent at the old store (the orders themselves stay there)
- Tags become customer groups. A tag that matches a group you already have (ignoring capitals) joins that group
- Newsletter: only customers the export marks as agreeing to marketing email are added, and someone who unsubscribed from your store stays unsubscribed. SMS consent is not imported
- New accounts get their address saved for checkout, so it's filled in the first time they order
- With CRM on, each customer also becomes a CRM contact (source: Import)
Importing the same file again doesn't create duplicates. The uploaded file is deleted when the import finishes.
How imported customers sign in
New accounts get a random password that nobody knows. Customers can:
- check out with their email: Kaniva emails them a sign-in code
- use Forgot password on your sign-in page
- use an account invite, if you send one (below). Someone who opens the link while signed in to a different account is asked to sign out first
Send account invites (optional)
On an import's results page, or at the top of the Customers list, Send account invites emails imported customers a message from your store: "Your account at {your store} is ready — set a password", with a link to choose a password. The link works once and lasts 7 days; after setting a password they're signed in.
- Only send invites to customers who expect to hear from your store
- Invites go only to new accounts the import created, and skip anyone who has signed in, ordered, or been invited in the last 7 days
- At most 200 invites go out per hour. If more are waiting, press the button again an hour later
Customers changing their own email
Customers change their name, email and phone on My Account in your store. Because the email is their sign-in at every Kaniva store, changing it asks for their Current password. A customer who never set one (an imported account, say) uses Forgot password first.
Customer Roles
| Role | Permissions |
|---|---|
| Customer | Place orders, view order history |
| Staff | Day-to-day admin and customers; not Settings, Analytics, themes, redirects, or managing staff and admins |
| Admin | Full store admin access |
| Owner | Complete control |
Adding staff, giving someone who already has a Kaniva login access to your store, and what each role can do: see Staff and Admins.
Customer Groups
Groups let you show private products to some customers and give them their own prices (dealers, wholesale, VIP).
Create a group
- Go to Customers & CRM → Customer Groups
- Click + New Group
- Fill in:
- Name, for example "Dealers" or "Wholesale"
- Description (optional)
- Default Discount Percentage: taken off every product for members, unless the product sets its own group price
- Click Create Group
Each group in the list has Manage Members, Edit and Delete. Deleting a group takes its members out of it; their accounts stay.
Add and remove members
- On Customers & CRM → Customer Groups, click Manage Members on a group
- Under Add Members, search for a customer and click + Add
- To take someone out, click Remove next to their name
You can also see a customer's groups on their page under Customers & CRM → Customers.
Private products for a group
- Open the product and go to the Visibility tab
- Choose Private
- Tick the groups under Visible to Customer Groups (or pick people under Visible to Individual Customers)
- Save the product
Only those customers see the product. Staff and admins always see every product.
Group prices on a product
On the product's Pricing & Cost tab, the Group Pricing table has a row per group:
- Fixed Price ($): the exact price for that group
- Or Discount (%): a percentage off the regular price
- Leave both empty to use the group's Default Discount
Tick Exclude from dealer pricing when members should pay full price for this product. It covers builders' discounts too.
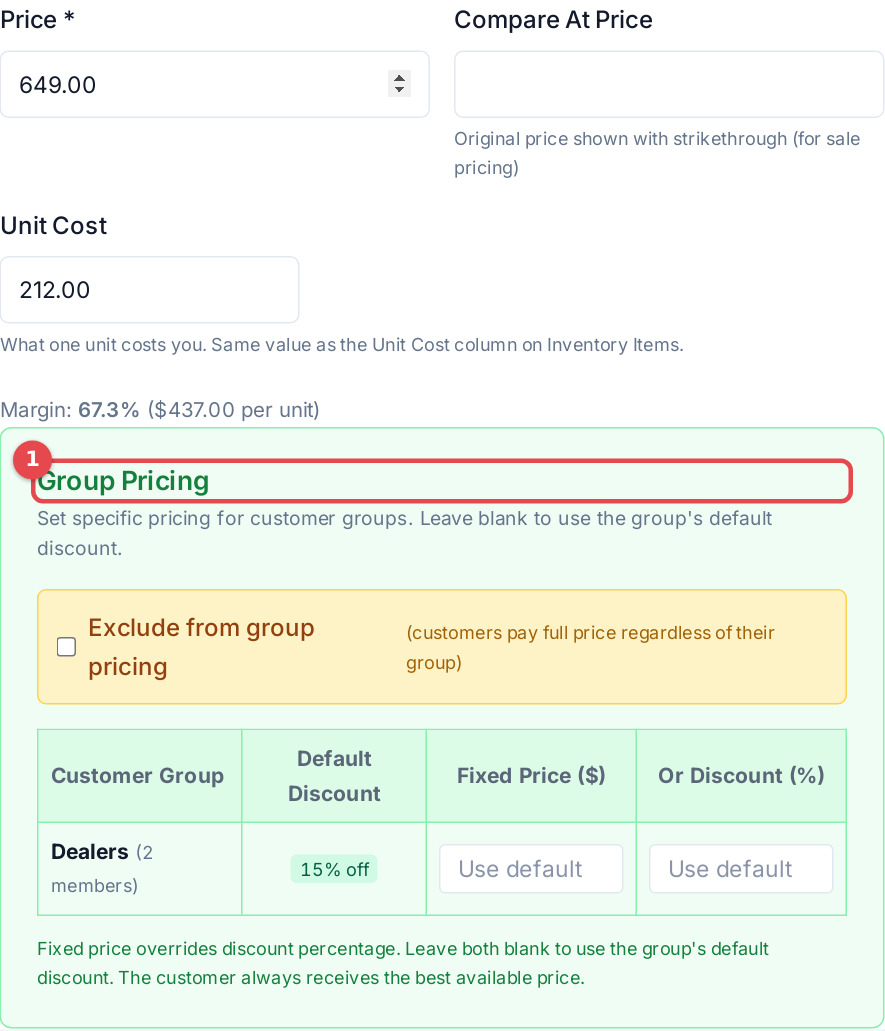 The Group Pricing table on a product's Pricing & Cost tab
Which price a customer gets
A customer gets the best price available to them from their group's default discount, a per-product group price, or a builder discount. How the special price looks on the storefront is set in Dealer Pricing.
Dealer Pricing
Settings → Dealer Pricing controls how special prices are shown to group members and builders.
- Price Label: what to call the special price: Builder Price, Dealer Price, Wholesale Price, Trade Price, Member Price, VIP Price, or Custom... with your own Custom Label
- Show Original Price (MSRP): show the regular price struck through next to the special price
- Show Discount Badge: show a badge with the label next to discounted prices, with a Badge Color you choose
- Preview shows how the price will look
Manage Customer Groups on that page takes you to the groups list. Builders get their own discount; see Builder Program.
Clearing tickets and callbacks
The AI phone agent and the website chat open a ticket for most conversations, so tickets can pile up. Customers & CRM → Tickets can clear many at once:
- To see only one kind, pick it under All Sources (Phone (AI), Chat, Email) and click Filter.
- Tick the tickets, or the box at the top of the list for the whole page. When more match than fit on a page, click Select all … matching to take every one the filter shows.
- Click Close. Customers aren't emailed unless you tick Email the customers. Each ticket gets an internal note saying who closed it. Owners and admins can click Delete instead, which removes the tickets and their messages for good.
Customers & CRM → Callbacks works the same way, with Mark completed, Cancel and (owners and admins) Delete.
Close old tickets by themselves. Under Settings → CRM → Close Old Tickets, enter how many days a ticket can go without a message before it closes. Choose Phone (AI) and chat tickets (the default) or All tickets. Kaniva checks each night, doesn't email the customer, and leaves a note on each ticket. 0 days turns it off, which is how every store starts.
CRM Activity
Customers & CRM → Activity is one feed of everything logged against your contacts, companies and deals: phone calls, emails, meetings, notes and tasks, newest first.
- Filter by type with the buttons across the top (All, Calls, Notes, …). Only types you actually have are shown. The search box matches the subject, the contact's name or a phone number.
- Calls show once each, with direction, duration and transcription status. View call opens the recording and transcript; Search Transcripts searches every call's transcript.
- Delete on a row removes that entry after you confirm. Deleting a call also deletes its recording and transcript.
- The old Activities and Call Logs pages now open this feed (Call Logs opens it filtered to Calls).
The Recent Activity list on the CRM overview shows the contact's name for a call from a number that matches a contact, even if the contact was added after the call. Repeated entries for the same contact and type within 30 minutes are grouped into one line with a count (for example ×3).