Order and receive stock
Use this when you're running low and need to buy more. You collect what you need on the Purchase List, order it from each supplier (with a purchase order or without), and check it in when the box arrives, so the stock lands in the right bins.
Before you start
- Ordering needs Advanced Inventory.
- Give each item you buy a Primary Supplier on its Edit page. A purchase order is made per supplier, and items with no supplier can't go on one. See Suppliers.
- Set each item's Trigger Level and Restock Quantity, so low stock shows up and + Purchase List adds the right amount.
The flow
- StartSome parts are running low
- 1Add what you need to Inventory → Purchase List
- TipA part with a BOM asks: the finished item, or its components?
- 2Check the quantities and the supplier groups on the list
- Do you want a purchase order?Yes
- Click Generate PO under the supplier
- On the PO, click Submit
- Click Send Email to Supplier or Mark as Sent
No- Order however you like, then click Mark All as Ordered
- 3When it arrives, open Inventory → Receiving
- Did the supplier ship it straight to your customer?Yes
- Click Mark Shipped, then Mark as Shipped on the PO
- Enter the tracking and click Confirm Drop Ship Complete
- Done
No- Carry on below
- Is it on a purchase order?Yes
- Click Receive, fill in Receiving Now, click Receive Items
No- Click Receive All on its row, or Details to receive part of it
- 4Move stock out of the home bin if it lives somewhere else
- DoneThe stock is on the shelf and the order is closed
Step by step
1. Add to the Purchase List
Any of these puts an item on Inventory → Purchase List:
- Add low-stock items at the top of the Purchase List: every item at or below its Trigger Level, at its restock quantity, in one click.
- + Purchase List on a row of Inventory → Items (adds the restock quantity). Tick several rows and click Add to purchase list to add them together.
- Add to Purchase List in the reorder box on an item's page.
- Quick Add on the Purchase List itself: pick the Item, type the Quantity, click Add to List.
- Add to Purchase List after scanning a kanban card, or Order on a stock alert.
An item already on the list shows On list and isn't added twice. An item already on an open purchase order (or marked as ordered without one) is skipped too, so nothing is ordered twice; the message says how many were added and how many skipped.
Items with a Bill of Materials ask what to add. Add finished item buys the finished part. Add components (raw materials) works through the BOM, sub-assemblies included, and adds the raw materials you're short of (or that would drop to their reorder point) to build that many.
2. Check the list
On the Purchase List, change a quantity in place or remove a line with ×. By Supplier shows a group and a total for each supplier. Lines under No supplier have no Generate PO button: give the item a supplier on its Edit page first.
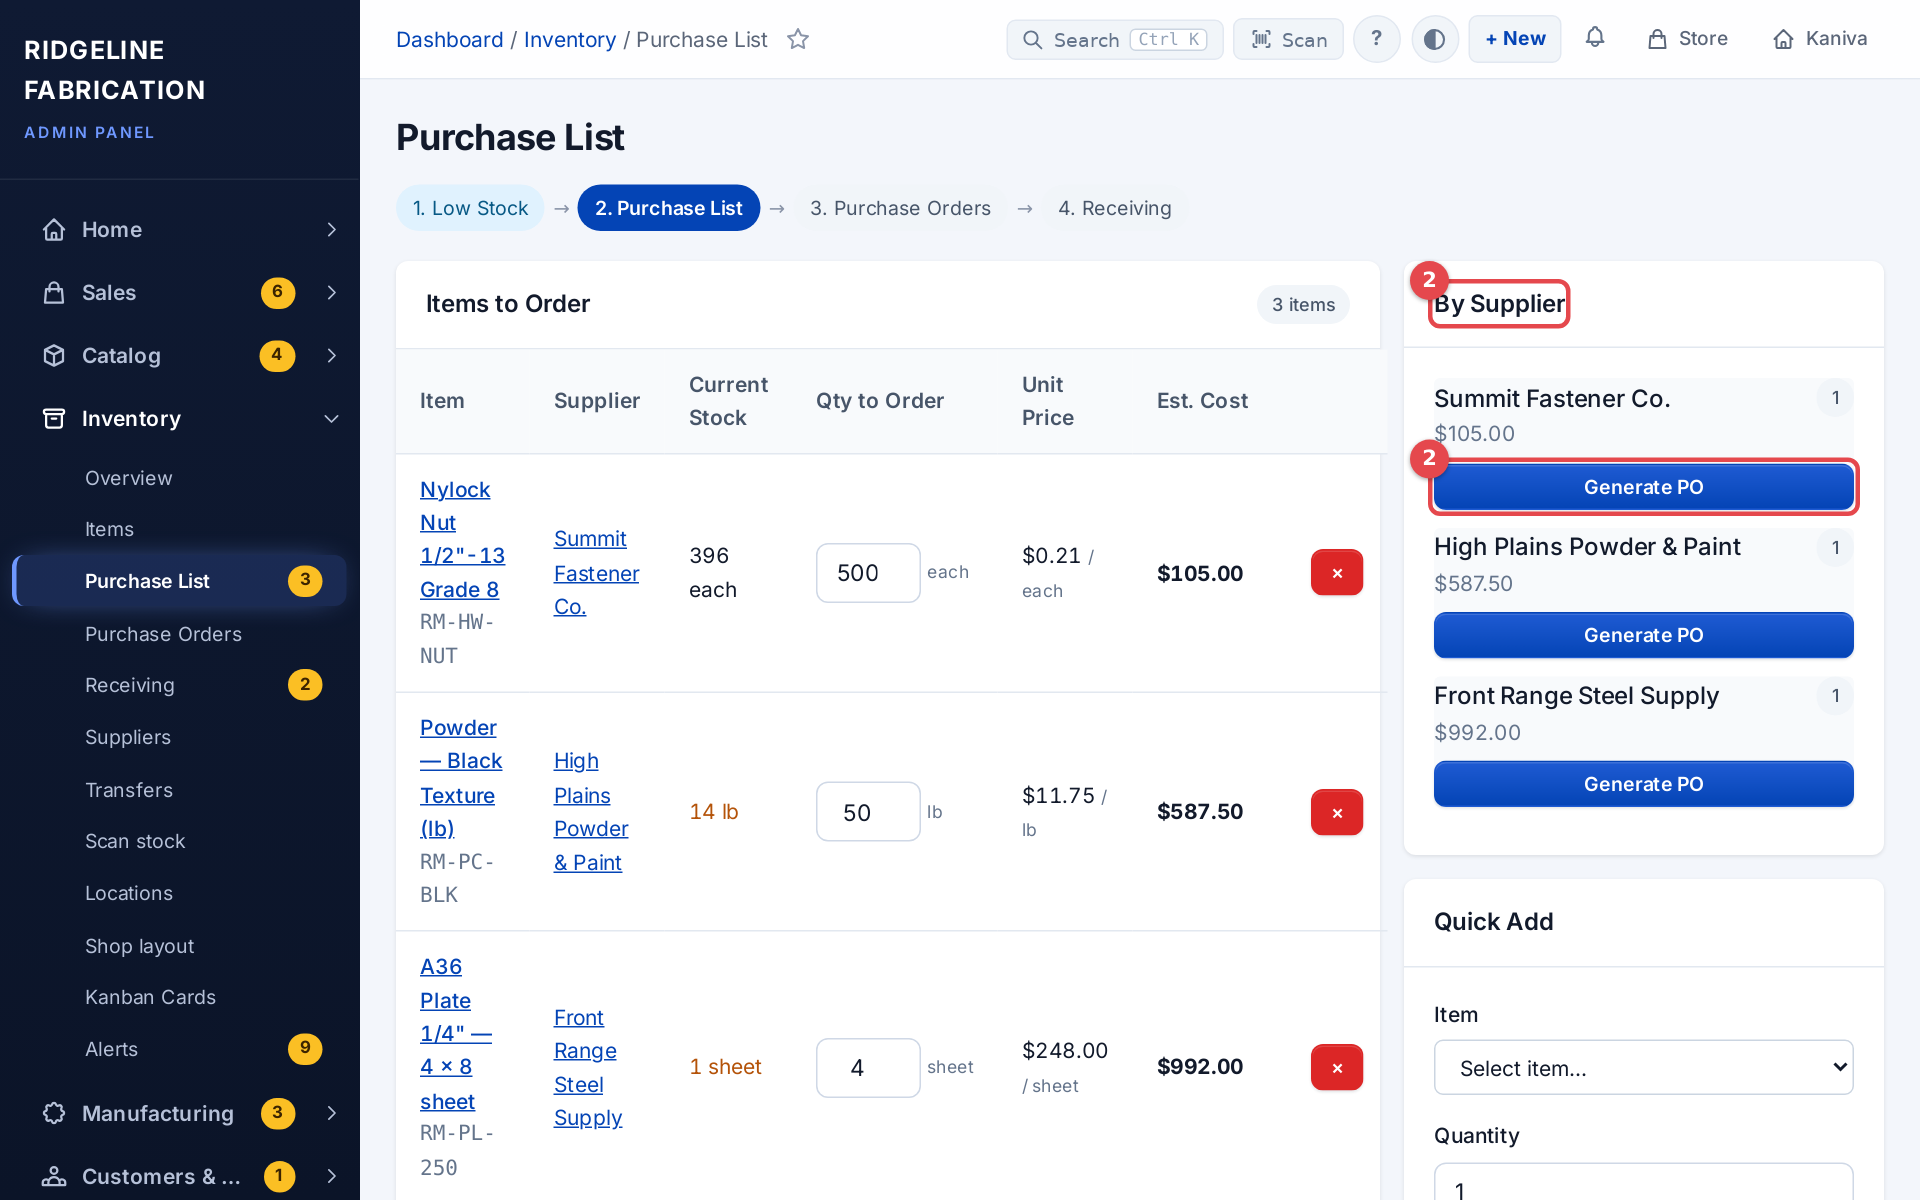 The Purchase List with Generate PO for each supplier
With a purchase order
- Click Generate PO under the supplier. Kaniva makes a Draft PO with that supplier's lines and opens it.
- Check it, and click Edit to change quantities, costs, the expected date, payment terms or notes for the supplier. The expected date starts as today plus the longest Lead Time (days) among the PO's items, when they have one.
- Click Submit.
- Click Send Email to Supplier to email it, or Mark as Sent if you ordered another way.
You can also make a PO from a customer order: + Create Purchase Order on the order's page. See Where POs come from.
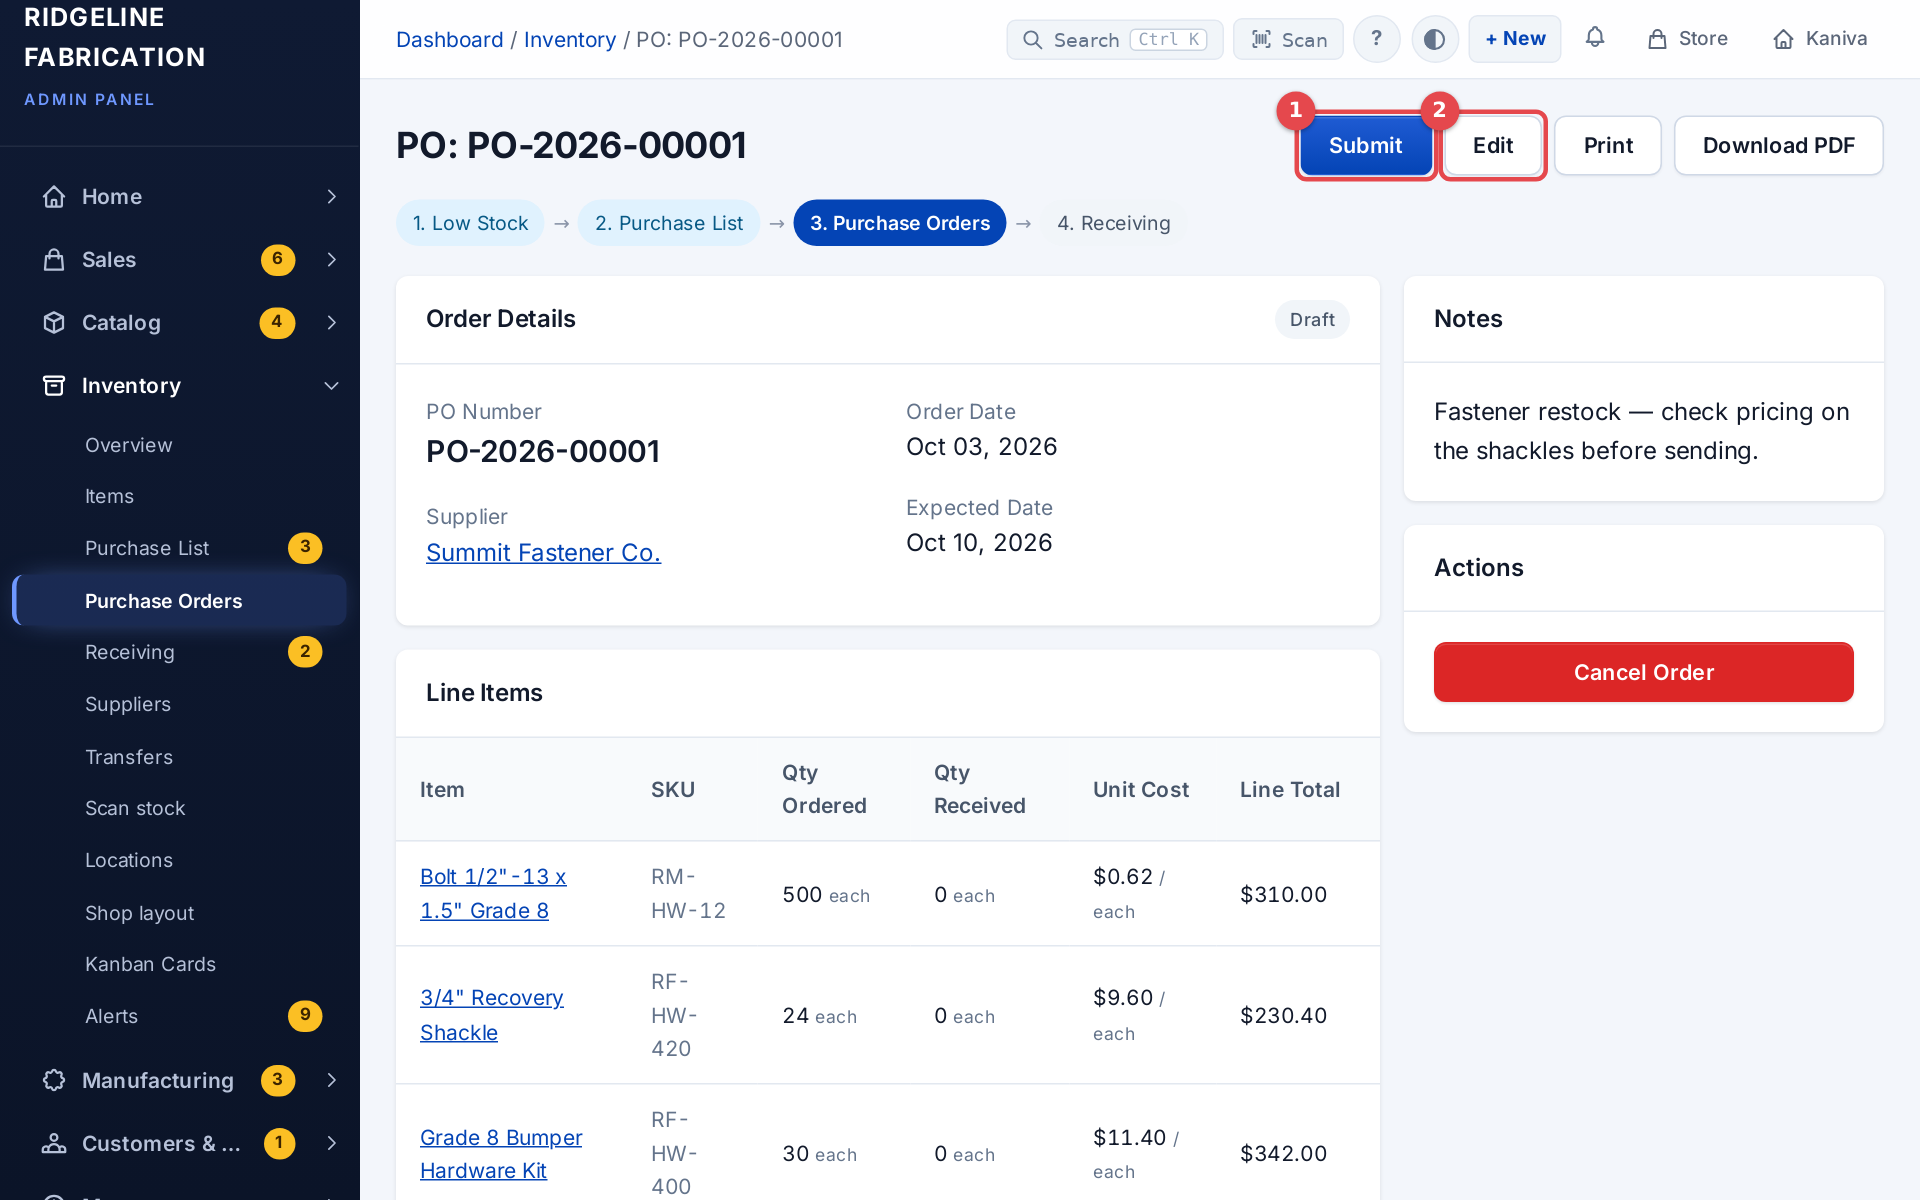 A draft purchase order with Submit
Without a purchase order
Order by phone, website or email as you normally would, then click Mark All as Ordered on the Purchase List. Every line is recorded as ordered and waits on the Receiving page under its supplier. No PO is made.
3. Open Receiving
When the box comes in, open Inventory → Receiving. It lists Purchase Orders Awaiting Receipt, then orders without a PO by supplier. The sidebar badge shows how many are waiting.
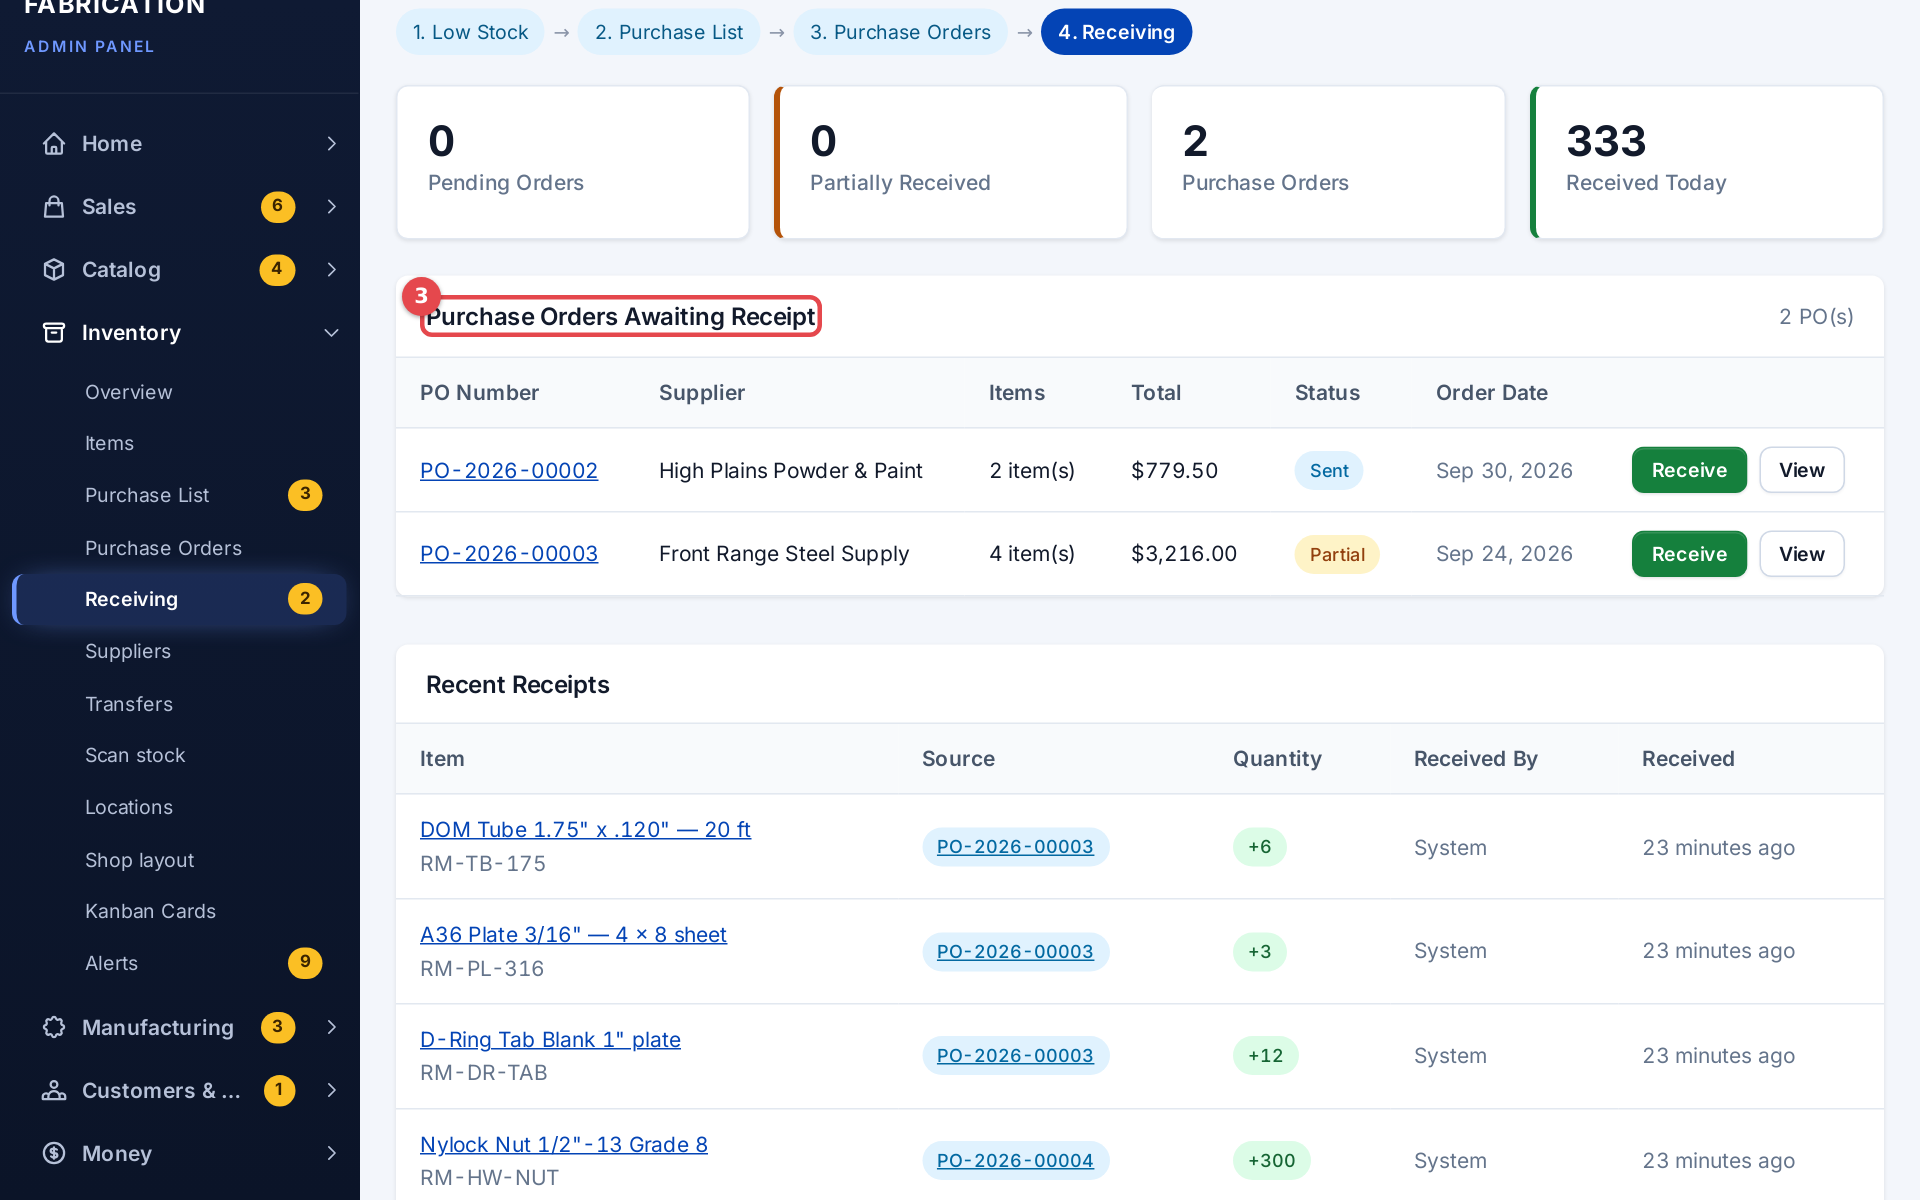 The Receiving page
Drop-ship orders
A drop-ship PO (the supplier ships straight to your customer) shows Mark Shipped instead of Receive, because the items never come to your shop. Open it, click Mark as Shipped, enter the supplier's tracking, and click Confirm Drop Ship Complete. The tracking is copied to the customer's order and your stock doesn't change. See Drop-ship purchase orders.
Receiving a PO
- Click Receive on the PO.
- Type Receiving Now for each line: what's actually in the box. Change New Cost if the price changed.
- Click Receive Items.
If only part of the order came, receive what's there. The PO goes to Partial and stays on the Receiving page until the rest arrives. Every receipt is listed on the PO's Receipts card.
Hang the kanban cards back. When a receipt brings in the rest of a line ordered from a kanban card, the PO's page opens with Hang these cards back: each card number, the item, and the location the card hangs at (with the location's barcode). The card is Active again. If only part of that line came, the page says the card stays On Order until the balance arrives and how many are still to come: keep it off its hook until then.
Scanning the PO. Scan the barcode on a printed PO (or type its number in the Scan box) and Receive Items opens straight away while the PO can still be received. A draft, received, cancelled or drop-ship PO opens its page instead.
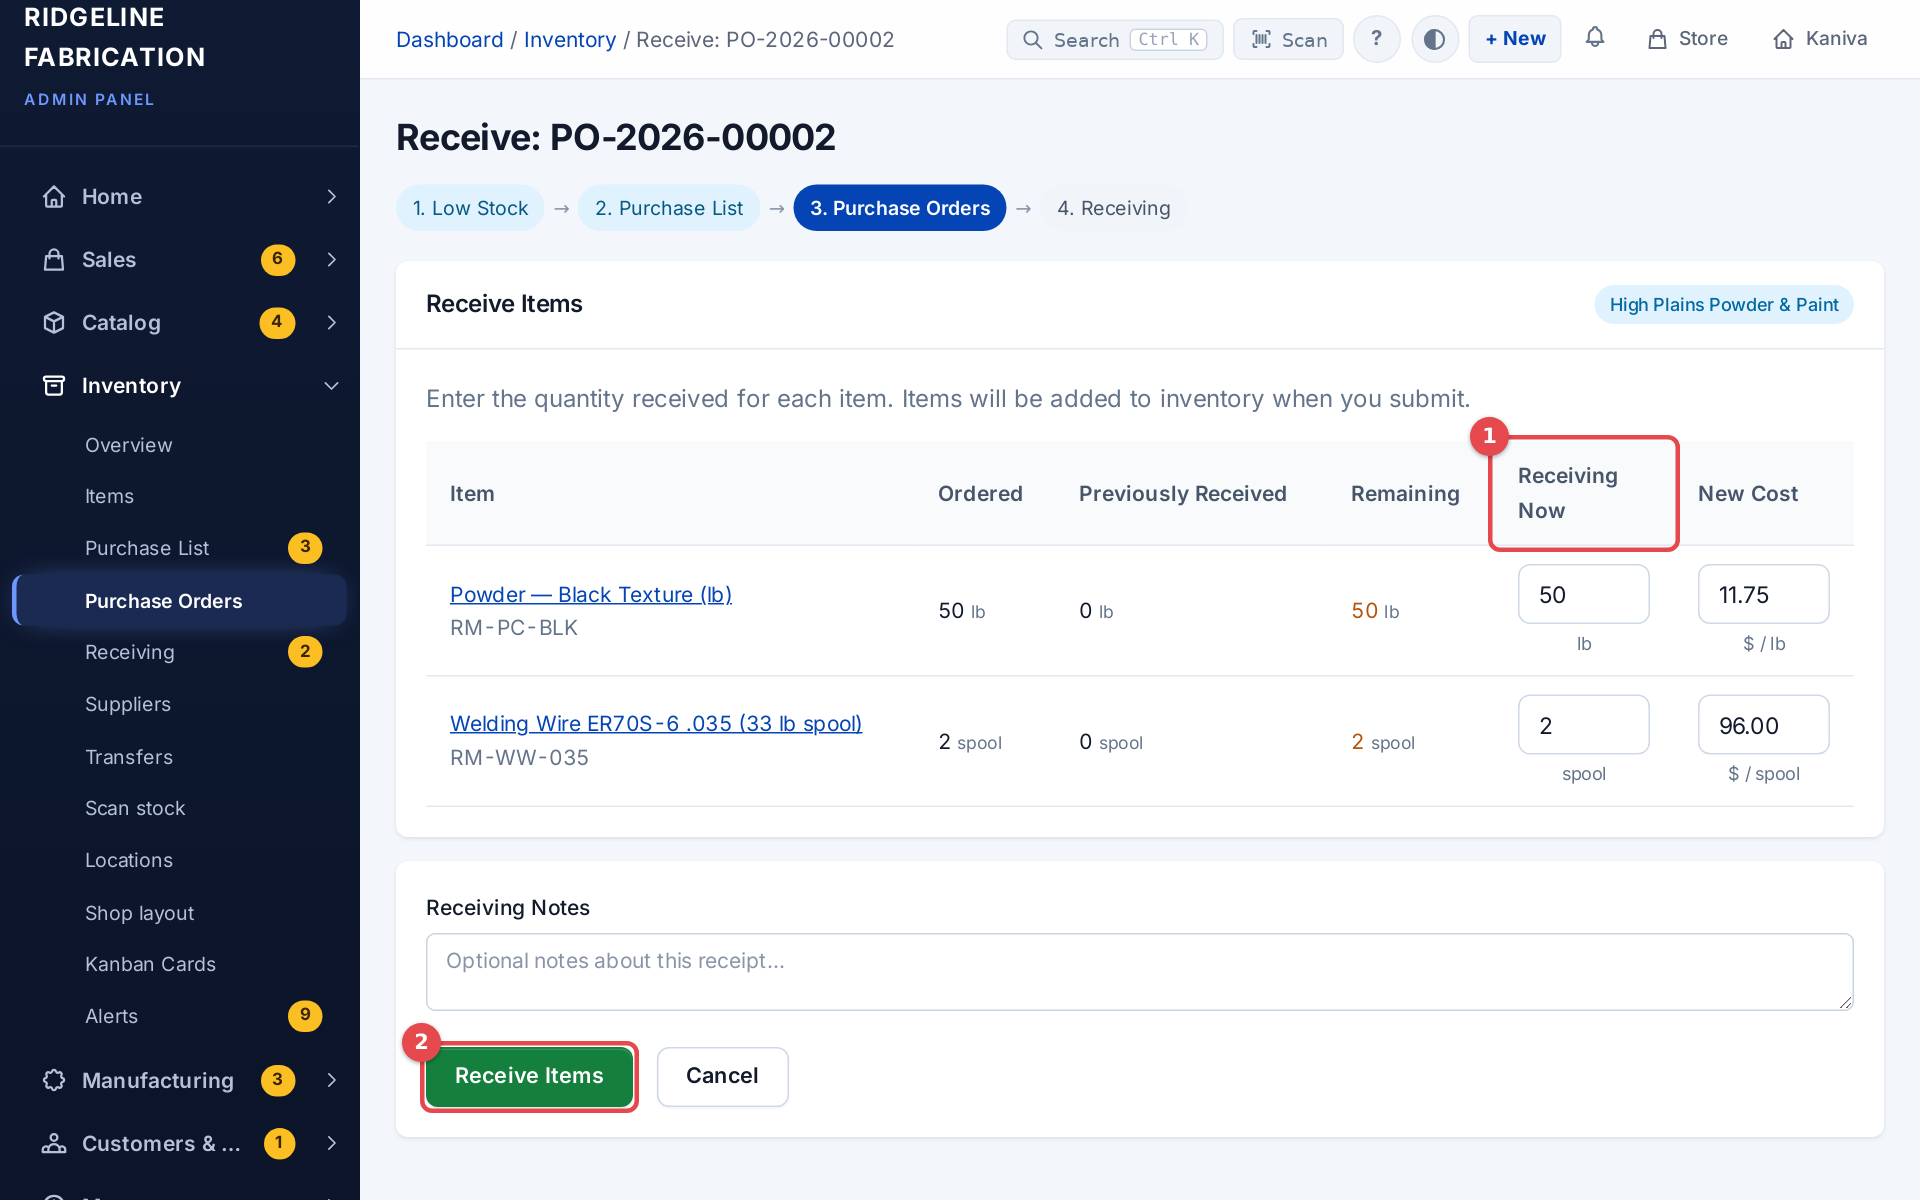 Receiving a purchase order
Receiving an order without a PO
Click Receive All on the row to receive the whole quantity. If only some came, click Details, type the Quantity to Receive and click Receive Stock. If the order came from a kanban card, the card goes back to Active once everything has arrived, and the message tells you which card to hang back and where (for example Hang card KC-00001 back at A-04-3.).
4. Put it where it lives
Received stock goes into each item's home bin. If some of it goes somewhere else (an overflow shelf, a work zone), move it: Move next to the bin on the item's page, or the Scan page (scan the new bin, the part, then Move all N here from …).
If something goes wrong
- An item wasn't added: it's already on the list or on an open purchase order. The stock alert Order page shows which PO.
- No Generate PO button for some lines: those items have no supplier. Set Primary Supplier on the item's Edit page.
- Ordered by mistake: open the PO and click Cancel Order. Leave return the unreceived items to the purchase list ticked to put them back on the list. See Cancelling a purchase order.
- Received the wrong quantity: fix the bin with Count on the item's page. See Count and adjust stock.
Related
- Suppliers, purchasing and receiving
- Inventory: items, kanban cards, alerts
- Add a part and put it on a shelf