Shipping & Fulfillment
Kaniva buys shipping labels through Shippo (USPS, UPS, FedEx, DHL and the other carriers Shippo offers), prints them, emails the customer the tracking, and marks the order shipped. You set up Shippo, your ship-from address and a label printer (PrintNode) at Settings → Shipping (see Settings).
For the whole job from a paid order to a box with a tracking number, follow Pick, pack and ship an order.
Two ways to ship
- One box, one label. On the order's page, in Shipping & Fulfillment, click Ship while nothing is packed yet. You enter the box size and weight, pick a rate and buy the label. Kaniva makes a box with every physical item on the order for you, so the packing page stays right.
- Packed boxes. Click Pack boxes to pack the order into one or more boxes, then label each box at Sales → Shipping Station. Use this for orders that go out in several boxes, and for reships.
Shipment boxes on the order page
The Shipment Boxes card on the order's page has Pick list (see Orders) and Pack boxes. Each box has:
- Ship (boxes without a label): opens the Shipping Station with this box already scanned
- Slip: the packing slip, in a new tab
- Label: the shipping label PDF, in a new tab
- Void: voids the label (see Voiding a label)
The order page also shows how far each line has got: shipped quantities with box numbers ("1 of 2 shipped"), packed but unlabelled items, dropshipped items with their purchase order, and what's still to ship.
Packing boxes
Pack boxes opens the order's packing page.
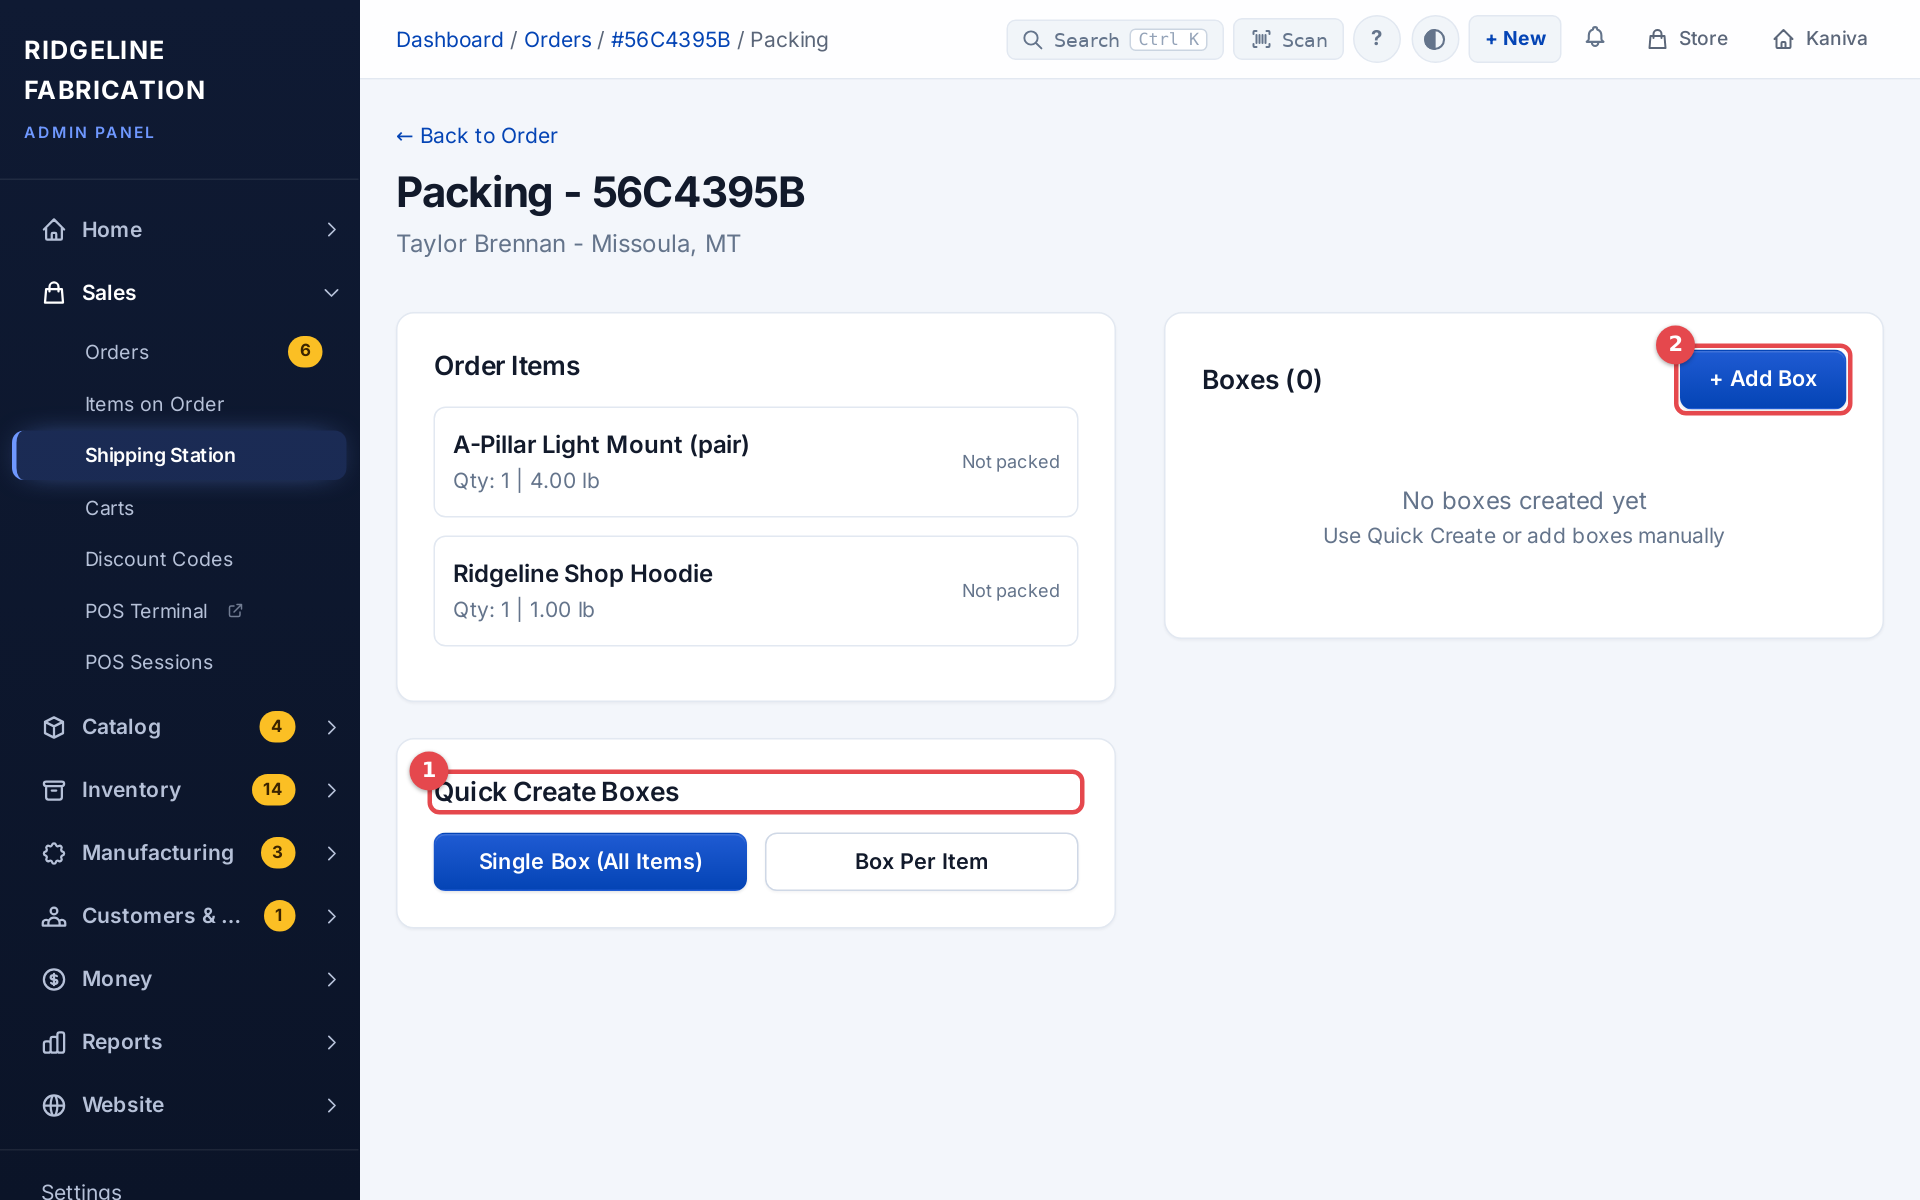 The packing page with Quick Create Boxes and + Add Box
- Quick Create Boxes packs the order in one click: Single Box (All Items) or Box Per Item.
- + Add Box opens Create New Box: tick the items that go in it (and how many), add Dimensions (optional) and Weight (optional) and any Notes, then click Create Box.
- Each box has Print Slip, Delete, and View Label once it has a label.
- Go to Shipping Station takes you to label the boxes.
Items your supplier ships for you (dropship) are listed separately and can't be packed here. Items already shipped show Shipped.
Reships and replacement parts. To send something again on an existing order, open Pack boxes, click + Add Box, and tick the original items or type the contents under Or type contents (for reship / replacement parts) (for example "Replacement gasket, 2x bolts"). Create the box, then ship it from the Shipping Station.
Shipping Station
Sales → Shipping Station is built for a barcode scanner: scan a box, check it, buy and print the label, scan the next.
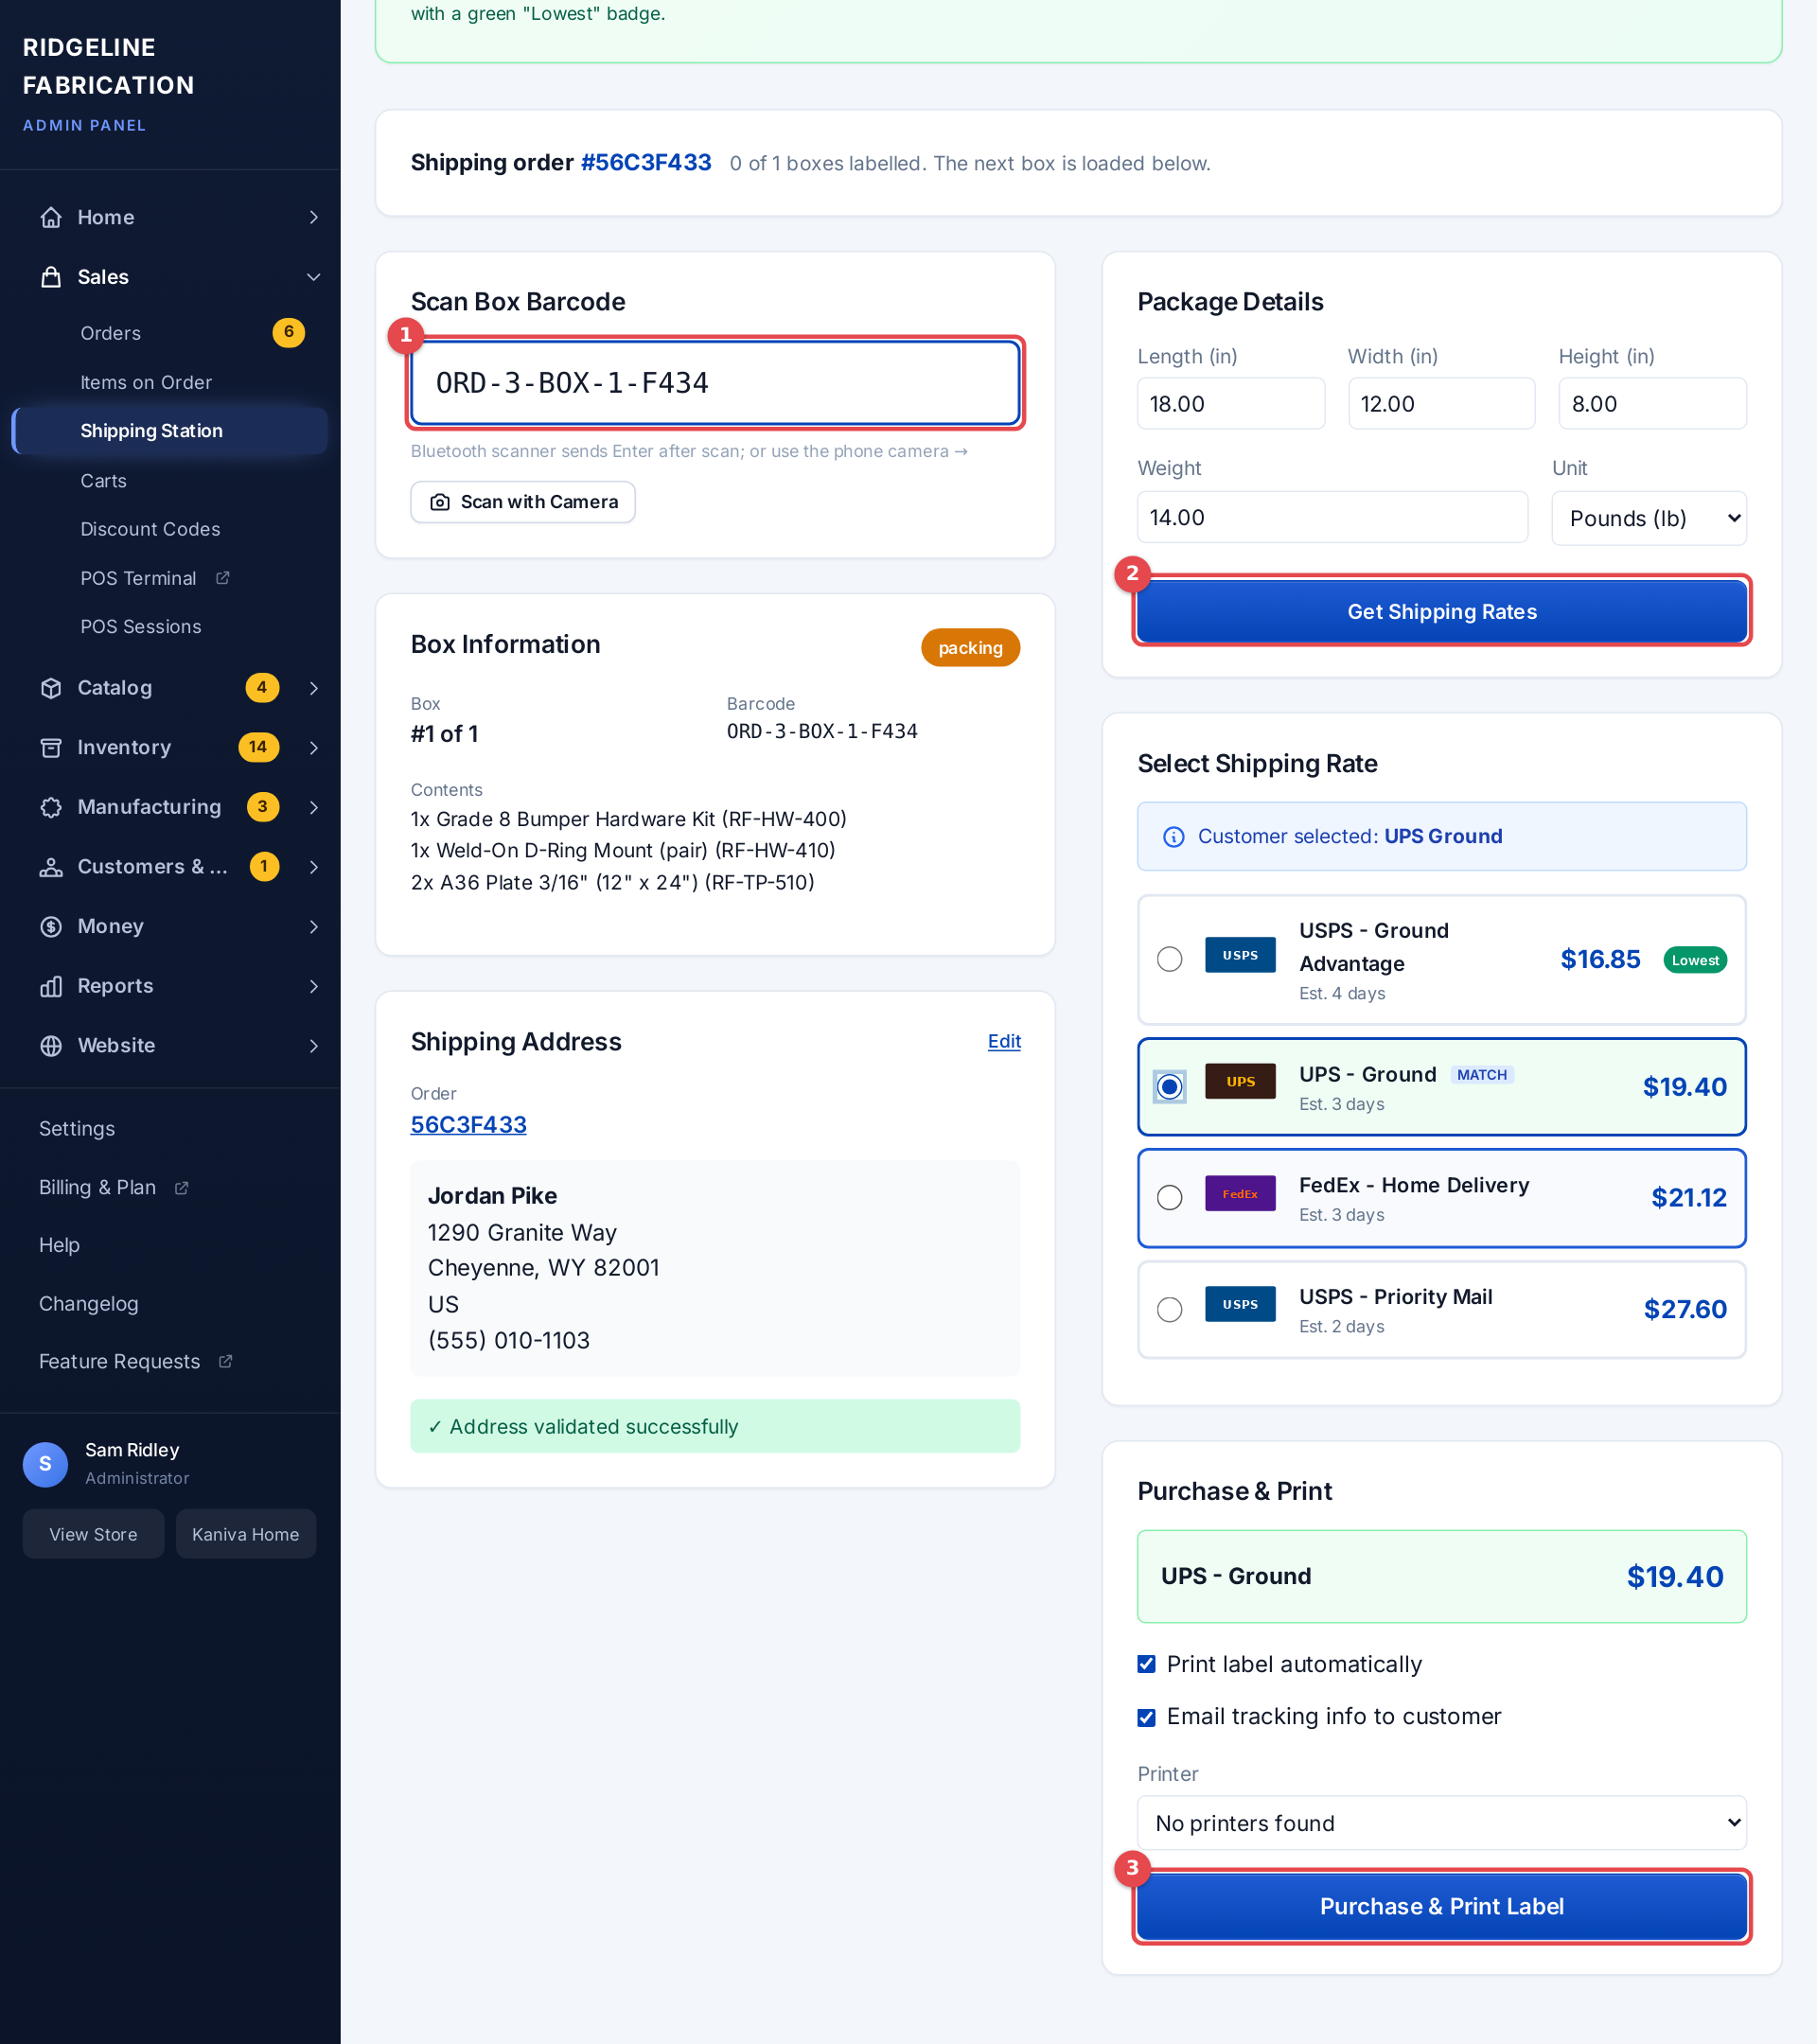 The Shipping Station with a box loaded and rates shown
- Scan the box barcode from its packing slip, or type it in. On a phone or tablet, Scan with Camera uses the camera.
- Check the order and customer under Box Information and Shipping Address.
- Check the Package Details: Length, Width, Height and Weight. With a USB scale on your Machine Connect PC, put the box on it: under the Weight box the Scale line shows the reading live (2.35 lb · stable · METTLER TOLEDO PS60) and the weight fills in by itself once the reading is steady. Type a weight to use your own instead; Use scale switches back. Each computer remembers which scale it uses; the starting one is Default scale on Settings → Shipping.
- Click Get Shipping Rates and click the rate you want under Select Shipping Rate. The cheapest is marked in green.
- Under Purchase & Print, leave Email tracking info to customer ticked to send the shipping email, and Print label automatically to print on your label printer (pick the Printer).
- Click Purchase & Print Label. When it says Label Created!, stick it on the box. Download PNG and Download PDF are there if you need them.
- Click Scan Next Box.
A box that already has a label shows Already Labeled, with Download Label and Reprint Label.
From anywhere in the admin, scanning a box's packing slip with the Scan box in the top bar opens the Shipping Station with that box loaded.
When your customer scans the packing slip QR code, they see a tracking page for that box: the order number, its status, what's in the box, and the carrier and tracking number. To keep it private, it shows only the recipient's first name and town, never the full name or street address.
First visit. A How to Ship Orders guide sits at the top. Hide it with the ×; it stays hidden in that browser.
Checking the address
The Shipping Station and the single-label page check the address before you buy:
- Address validated successfully means it's good to go.
- Suggested Corrections shows what Shippo and Google Maps suggest (Google Maps also fixes misspelled street names). Click Use This Address on the one you want, or Keep original address anyway. Verify on Google Maps → opens the address on a map.
To fix it yourself, click Edit on the address, change the fields and click Save Address. Rates refresh with the new address.
Emails and order status
With Email tracking info to customer ticked, the customer gets a shipping email with the carrier, tracking number and estimated delivery date (when the carrier gives one). If your order steps email the customer at Shipped, they get that email instead, never both.
When a label is bought, the order updates on its own:
- One box: the order is Completed and moves to its Shipped step.
- Several boxes: it's Partially Shipped until every box has a label.
- Dropshipped items: the order also waits for each supplier to ship their part.
Voiding a label
If a label is wrong (address, weight, need to repack):
- On the order's page, find the box under Shipment Boxes.
- Click Void and confirm.
- Kaniva asks the carrier for a refund and sets the box back to packed. It keeps its contents and size, so you can label it again with Ship.
You can't void a label once the carrier has scanned the package (in transit or delivered). The order's status is worked out again after a void: if the other boxes still cover every item, it stays completed; if not, it goes back to processing.
Dropshipped items
Items a supplier ships straight to your customer don't go in your boxes. The order page has a Dropship card with each supplier's status. The supplier adds tracking through a private link, and your customer gets the shipping email. See Purchasing for setting a product to dropship.