Pick, pack and ship an order
Use this for every paid order with physical items. You walk the shelves with a pick list, pack the items into boxes, and buy and print a label for each box. When the last box has its label, the order is marked shipped and the customer has the tracking.
Before you start
- Shippo is connected and your ship-from address is set at Settings → Shipping (see Settings). For printing straight to a label printer, set up PrintNode there too.
- For pick lists in walking order, your stock is in bins on Inventory → Shop layout (Advanced Inventory). Without it, the pick list is a plain list of items. See Bins and scanning.
The flow
- StartA paid order is waiting to ship
- 1Open the order and click Pick list, or tick several on Sales → Orders
- TipPicking several orders? Print Tote cards and put one in each tote
- 2Pick each stop: scan the shelf label, then the part, or tap Picked
- Did you use tote cards?Yes
- Scan the tote card: the order's packing page opens
No- Open the order and click Pack boxes
- 3Click Quick Create Boxes, or + Add Box and Create Box
- 4Click Ship on a box (packing page or order page)
- TipOne box and nothing packed? Click Ship on the order instead
- 5Check the address; click Edit to fix it
- 6Check the size and weight, click Get Shipping Rates and pick a rate
- 7Leave Email tracking info to customer ticked
- 8Click Purchase & Print Label and stick the label on the box
- TipMore boxes? Click Scan Next Box and repeat from step 6
- DoneEvery box has a label, and the order is shipped
Step by step
1. Open the pick list
On the order's page, the Shipment Boxes card has Pick list. To pick several orders in one walk, go to Sales → Orders, tick the orders and click Pick list in the bar above the table. The list opens in a new tab.
The list puts the stops in the order you walk the shop, ending at your packing spot. Items already shipped, digital items and items your supplier ships for you are left out. Anything not on a shelf is listed at the end. See Orders for how stops are chosen.
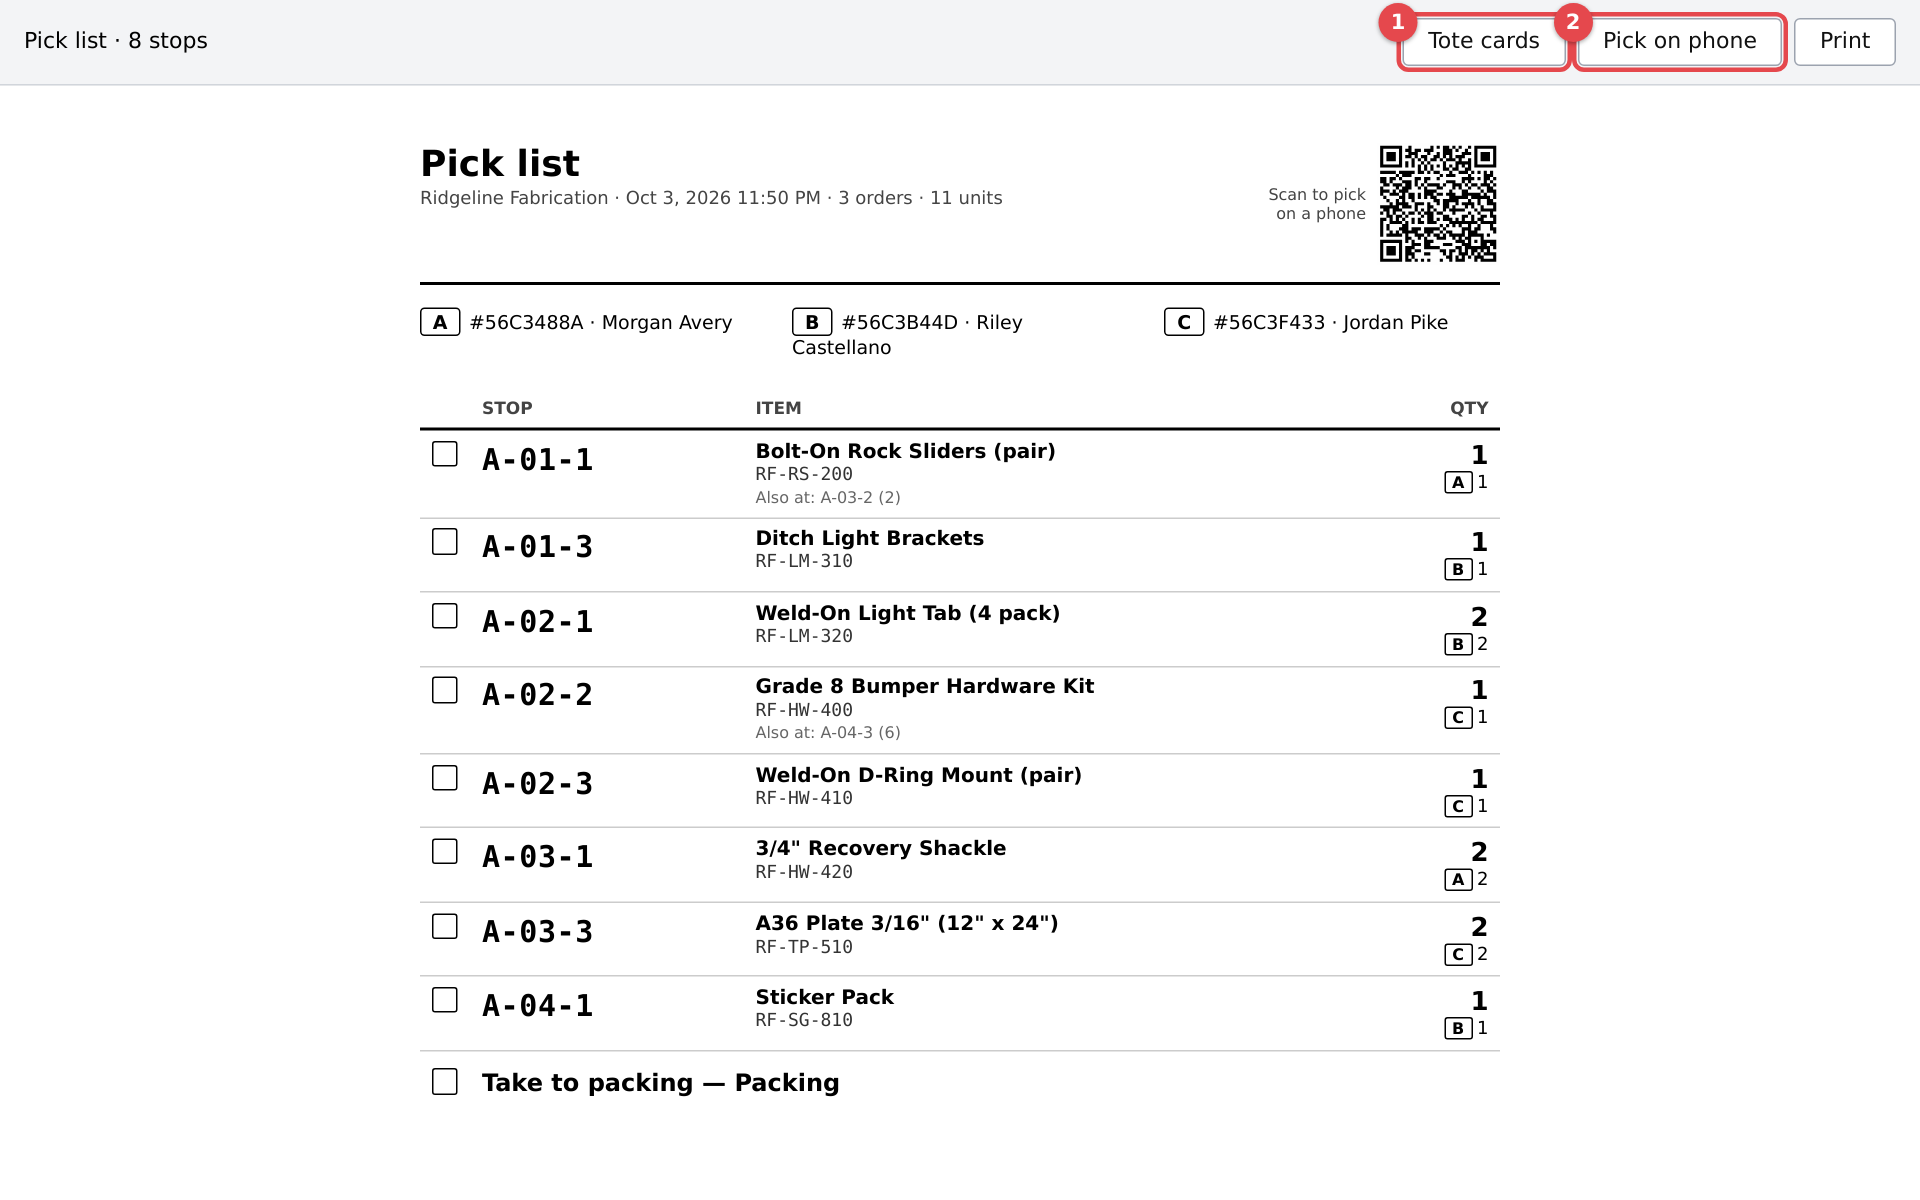 A pick list with its Tote cards and Pick on phone buttons
Tote cards (if turned on at Inventory → Shop layout, under Picking): one card per order, with its tote letter, a barcode and the same Scan to pick on a phone QR as the pick list, so a picker can start the walk from any tote card without the printed list. Print them and drop one in each tote before you walk.
2. Pick
On paper: walk the list and tick each stop.
On a phone: tap Pick on phone, or scan the QR code on the printed list. It shows one stop at a time:
- Scan the bin or shelf label first, then the part, or tap Picked. If a label is missing, use Label missing? Confirm the spot by hand.
- Skip moves a stop to the end; Back goes back one. Leave it short if there aren't enough.
- At the end it says All picked and lists anything skipped or short.
Picking on a phone marks each line as picked and moves its units off the shelf to Packing, a spot for picked stock that isn't a shelf. They are still on hand and still held for the order, so the shelf counts stay right while the order sits in a tote. Stock at Packing is never picked or sold for anything else. Picking a stop again with fewer puts the rest back on its shelf. On paper, nothing is recorded, and packing takes the stock from the home bin first.

3. Pack the boxes
Open the order's packing page. With tote cards, scan the card at the packing bench, with the Scan box in the admin top bar or any scanner on an admin page. Without them, open the order and click Pack boxes.
On the packing page:
- Quick Create Boxes packs it in one click: Single Box (All Items) or Box Per Item.
- Or click + Add Box, tick what goes in this box (and how many), add the size and weight if you know them, and click Create Box. Repeat for each box.
Print Slip prints the box's packing slip, with the barcode the Shipping Station scans. Put it in or on the box.
Putting items in a box is when their stock comes off your books (with Advanced Inventory). Picked items come out of Packing; anything not picked on a phone comes out of the home bin, then the fullest others. An order that is marked shipped or completed without being packed takes its stock then. If an order is cancelled after picking, its items stay at Packing: move them back to a shelf from the item's page.
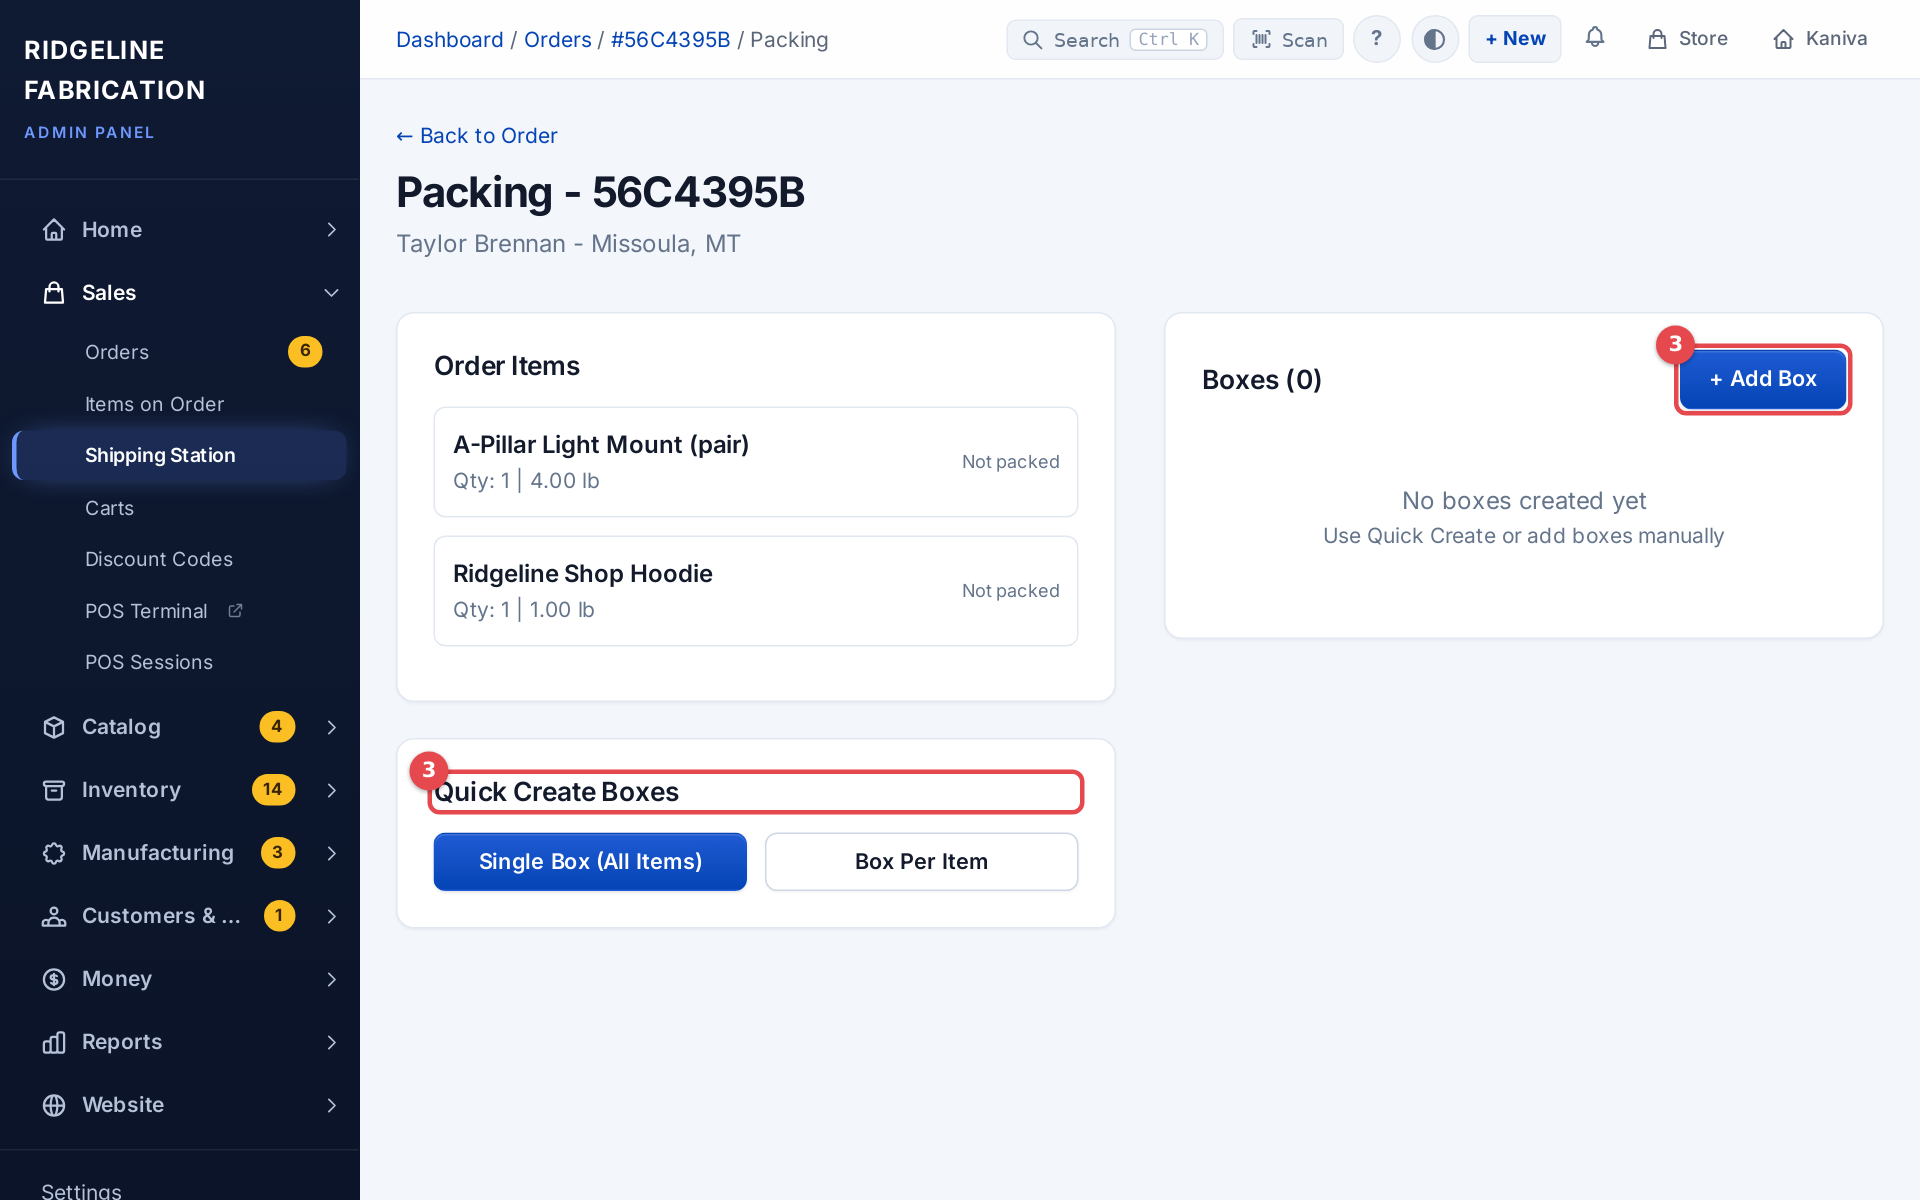 The packing page
4. Open the box at the Shipping Station
Each box without a label has Ship, on the packing page and under Shipment Boxes on the order: click it, and Sales → Shipping Station opens with that box scanned. Go to Shipping Station at the bottom of the packing page opens the station on this order's next box without a label. Or scan the box's packing slip with the Scan box in the top bar, or at the station.
If you're shipping the whole order in one box and haven't packed it, skip packing: click Ship in Shipping & Fulfillment on the order. You enter the box size and weight on the label page, and Kaniva makes the box for you.
5. Check the address
Kaniva checks the address with Shippo and Google Maps. Address validated successfully means it's fine. If it shows Suggested Corrections, click Use This Address on the right one, or Keep original address anyway. To fix it by hand, click Edit, change it and click Save Address.
6. Pick a rate
Check the Package Details (length, width, height and weight), click Get Shipping Rates and click the rate you want. The cheapest is marked in green.
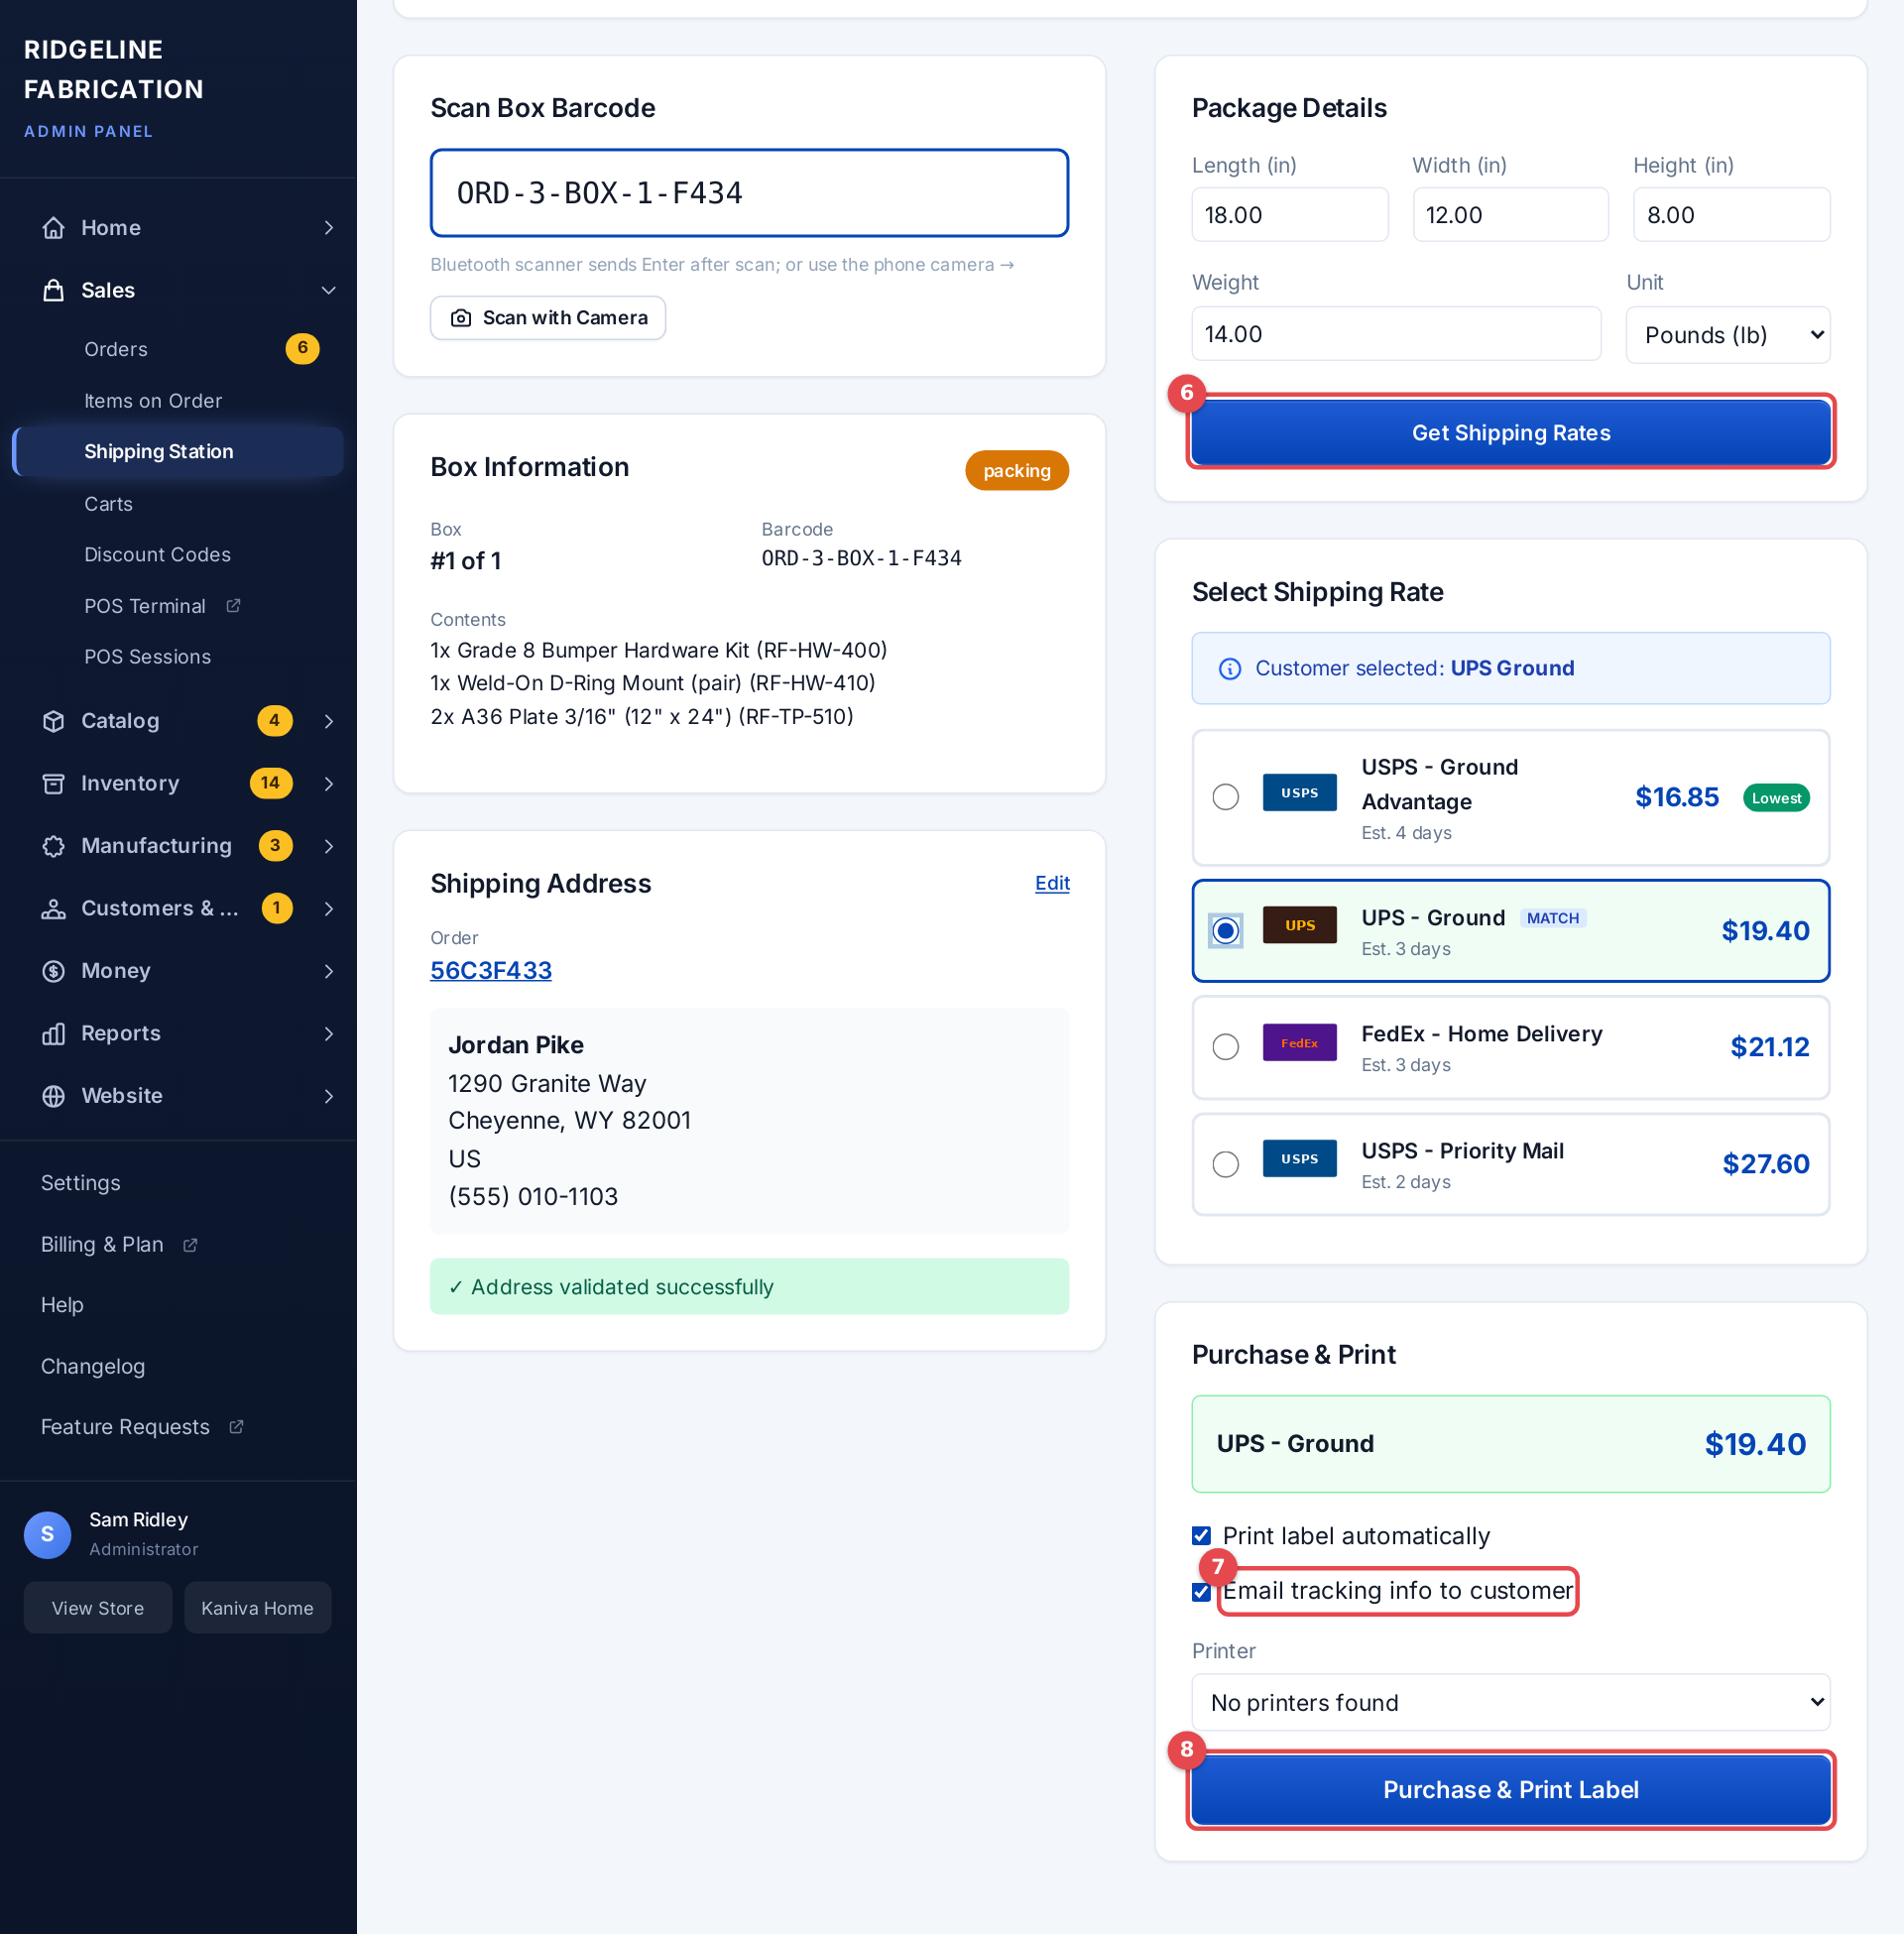 The Shipping Station with rates
7. Tell the customer
Leave Email tracking info to customer ticked to email the carrier and tracking number. Untick it to send nothing.
8. Buy and print the label
Tick Print label automatically and pick the Printer to print on your label printer, then click Purchase & Print Label. When it says Label Created!, stick the label on the box. Download PDF or Download PNG if you print another way.
For the next box, click Scan Next Box, scan its packing slip and go back to step 6. Or click Ship on the next box on the packing page or the order.
When it's done
When every box has a label, the order is Completed and moves to its Shipped step. Until then it's Partially Shipped. An order with dropshipped items also waits for each supplier to ship their part. Dropshipped items never go in your boxes: the order counts as packed once everything you ship yourself is boxed.
If something goes wrong
- Wrong label (address, weight, box): on the order page, click Void on the box. The carrier refunds the label, the box goes back to packed, and you can click Ship again. You can't void a label once the carrier has scanned the package.
- No rates: check the address and the package size and weight, and that Shippo is set up at Settings → Shipping.
- A box was missed or something needs reshipping: Pack boxes, + Add Box, tick the items or type the contents under Or type contents (for reship / replacement parts), then click Ship on that box. This works on an order that has already shipped too.
- Pick on phone isn't there: it needs Advanced Inventory and stock in bins. The printed list still works.