Inventory
The Inventory group in the sidebar keeps track of what you have, where it is, and when to order more. This page covers the overview, items, kanban cards, alerts and transfers. Bins, the shop layout and scanning are on Bins, shop layout and scanning. Suppliers, purchase orders and receiving are on Suppliers, purchasing and receiving.
Note: Most of this page needs Advanced Inventory. See Billing for what your plan includes. Without it you get a plain stock list at Catalog → Inventory, where you type each product's stock and click Save All Changes.
Inventory overview
Inventory → Overview is the summary page:
- Total Items, Low Stock, Out of Stock and Total Stock Value cards across the top.
- Active Alerts: unresolved stock alerts.
- Open Purchase Orders and Pending Transfers.
- Low Stock Items, with a Reorder link for each and View All for the full list.
If some of your store's products don't have an inventory item yet, a Product Sync card at the top says how many are linked. Its Import N Products button makes items for the missing ones (digital and build-to-order products are skipped).
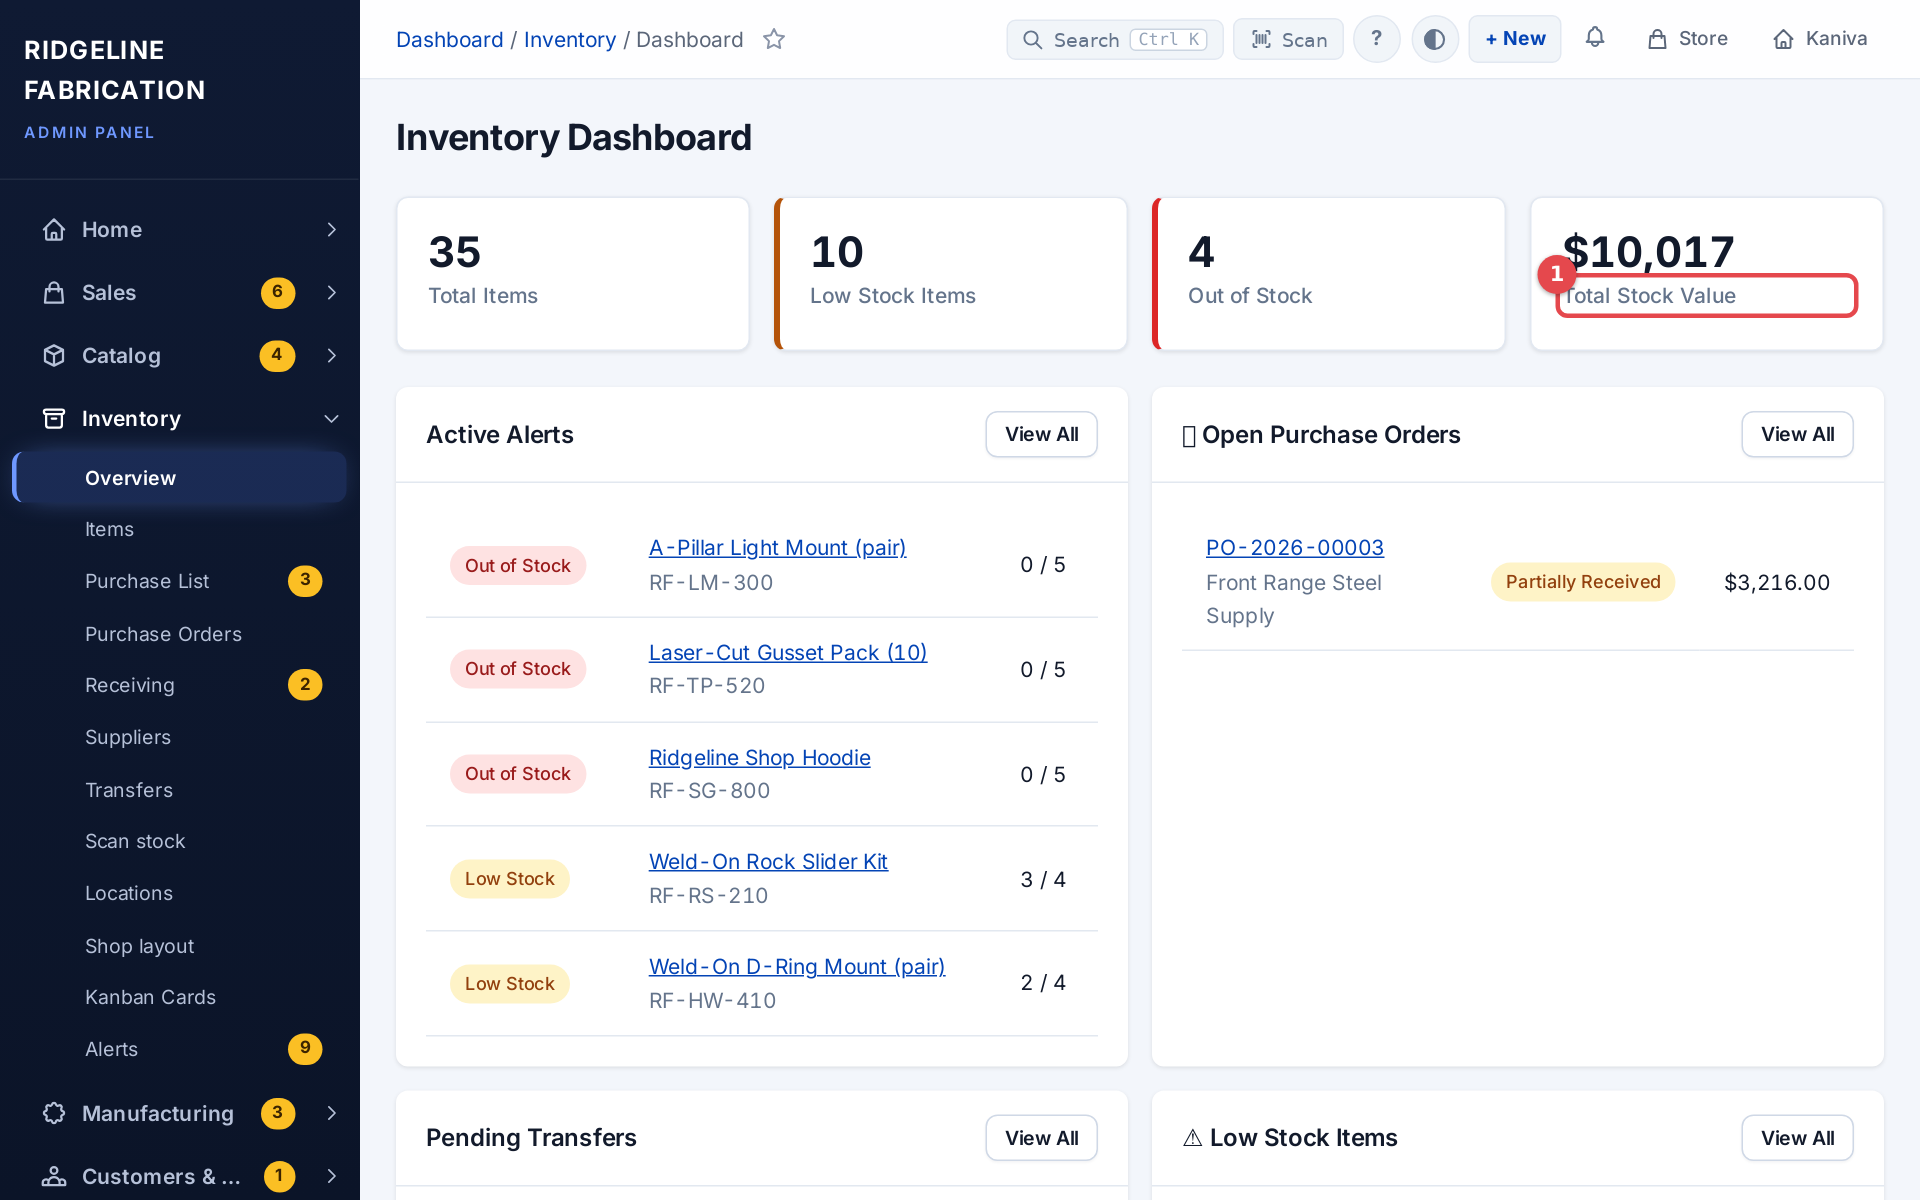 The Inventory overview with its stock cards
Items list
Inventory → Items lists every active product's stock, plus parts that aren't products. Digital products have no stock, so they're listed only when you pick Digital under Product Type. Use Saved views at the top to save the current search, type, stock, supplier and location filters under a name and pick them again later. Only you see your saved views.
- The cards filter the list when clicked. Low stock counts items at or below their own reorder point; the smaller line under it, with 5 or fewer, counts the ones down to 5 or less and filters to those. On Purchase List opens the Purchase List.
- Stock is a link for anything kept in bins: it opens the item's page, where stock changes bin by bin. Prices can be changed right in the list (Save All Changes saves them), and an item's unit cost saves as you type.
- A product with variants shows the total of its variants' stock (and how many variants), and each variant row underneath shows its own stock and bins.
- Stock reads Not tracked when tracking is off. Track and Active aren't switches in this list; change them on the product (its Inventory tab, or the variant table).
- + Purchase List on a row adds that item at its restock quantity. To add several, tick them (or Select all) and click Add to purchase list. An item already on the list shows On list instead.
- + New Item makes a part that isn't a product (see Creating an item).
- Import items brings in a parts list from a spreadsheet (see Importing items from a spreadsheet). Owners and admins only.
- Make Kanban cards makes a kanban card for each ticked item that doesn't have one yet, then shows the new cards with Print these N cards.
- On a phone each row is a short card: name, stock, price and bins. Type, cost, supplier and margin are on the item's page.
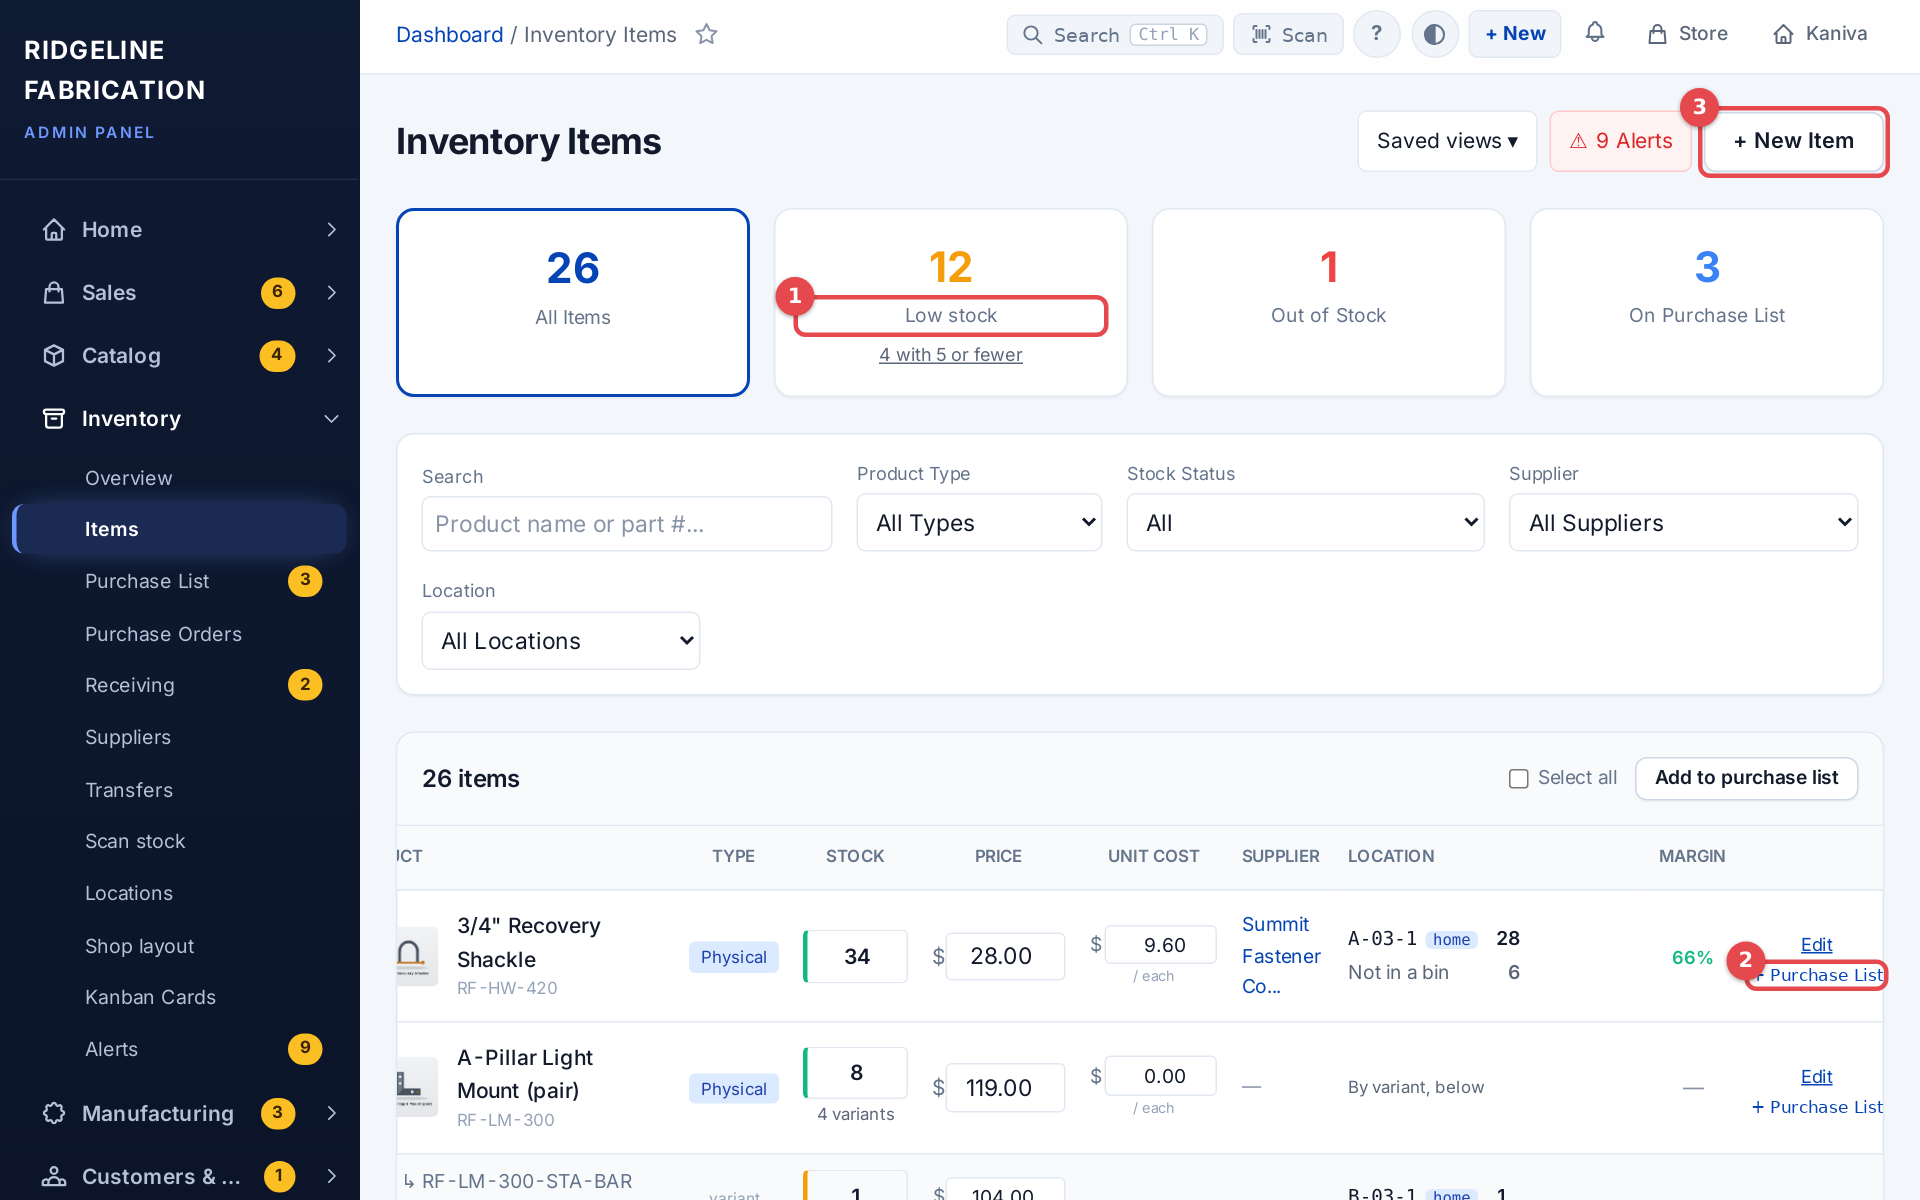 The Items list with its filter cards
Items
Each item tracks stock, bins, cost and supplier for one part.
Items linked to a product take their name, description and photo from the product: the item's page shows them, and Edit on product → is where you change them (what customers see lives in one place). The item keeps the inventory side: bins, cost, supplier and supplier part number, reorder point, unit. Its SKU is the product's part number (a variant's item: the variant's SKU), so one part has one code on every label, pick list and purchase order. Change the part number on the product and the item's SKU follows; the old code keeps scanning, so labels already printed still work. A product with no part number leaves the item with a made-up code (PROD-…) until you give it one. A part that isn't a product (raw material, hardware) has its own name, description and photo on its Edit page.
Items made for new products
When you create a physical product, Kaniva makes its inventory item for you. The item's home bin is your starting location (see Where new products start), its reorder point is 5 and its restock quantity is 10; change them on the item's Edit page. Any stock you typed on the new product counts in the item's total as Not in a bin until you put it away.
After that, the product form doesn't take a typed stock number: under Stock Quantity it shows Change stock bin by bin →, which opens the item's page.
Creating an item
For parts that aren't products, open Inventory → Items and click + New Item, or pick New Inventory Item from + New at the top of any admin page:
| Field | What it's for |
|---|---|
| Link to Product (Optional) | Pick a product to link this item to it. Leave -- Standalone Inventory Item -- for a part you don't sell. A linked item takes its name, description and photo from the product |
| SKU | Left blank, Kaniva makes one up. A linked item uses the product's part number |
| **Name *** | The part's name |
| Description, Image | For standalone parts. Upload a photo (JPG, PNG, GIF, up to 2MB) or enter an image URL |
| Primary Supplier, Supplier SKU | Who you buy it from and their part number. Purchase orders are made per supplier |
| Supplier URL | A direct link to reorder it from the supplier |
| **Unit Cost *** | What one stock unit costs you |
| Lead Time (days), Min Order Qty | How long the supplier takes (it sets a new purchase order's expected date), and the least you can order |
| **Stock unit *** | How you count it and use it on BOMs (each, ft, sq_in…). Type any unit or pick from Presets |
| Purchase unit (optional), Stock units per purchase unit | The unit you buy in (a sheet, a bar, a roll) and how many stock units are in one. The Purchase price calculator turns what you paid for one purchase unit into a unit cost: click Use this cost |
| **Trigger Level (Reorder Point) *** | When stock falls to this, the item is low and an alert is raised |
| **Restock Quantity *** | How many to order by default |
| **Home bin *** | Where the part belongs: picking and put-away go here first. It starts on your default bin: tick Use this bin for new items to make the one you picked the default. Until you set one, it starts on the bin most of your items already use |
| Bulk Storage Location | Where the overflow is kept, if you refill the home bin from it |
| Initial Stock | How many you have now. It counts as Not in a bin until you put it away |
| Auto-generate Kanban card | Ticked by default: makes a kanban card for the item |
Click Create Item. You land on the item's page.
The Edit page has the same fields plus Order Multiple (order quantities must be multiples of this) and Delete Item under Danger Zone, which also removes the item's kanban cards and stock history.
Importing items from a spreadsheet
To add a whole parts list at once, open Inventory → Items and click Import items (owners and admins only):
- Click Download the template and fill in one part per row, or use your own spreadsheet: columns are found by their heading in any order, and common names work too (Part Number, Reorder Point, Vendor, Bin).
- Save it as CSV (up to 5,000 rows) and click Upload and preview.
- The preview changes nothing. It shows how many items are new and how many will be updated, the Kanban cards and stock changes, the suppliers that will be created, any locations it couldn't find, and the rows with problems (no SKU, a number that isn't one, a SKU used twice), which are skipped.
- Click Import N items. The import runs in the background; when it's done, Print the N new cards downloads the new Kanban cards as one PDF.
| Column | What goes in it |
|---|---|
sku |
Required. An item with this SKU is updated; otherwise a new item is made |
name, description |
The part's name (needed for a new item) and description. An item linked to a product keeps the product's |
unit_cost |
What one costs you |
on_hand |
How many you have now. The stock is set to this through an adjustment, so it shows in the item's stock history, in its home bin |
trigger_level, restock_quantity |
The reorder point and how many to order |
supplier, supplier_sku, lead_time_days |
Who you buy it from, their part number, and how many days they take. A supplier you don't have yet is created |
location |
The home bin's code, name or path. Only your existing locations are used: an unknown one is listed in the preview, and a new item goes to your default bin instead |
make_card |
yes or no. New items get a Kanban card unless it says no; an existing item gets one only with yes, and never a second |
A blank cell never changes an item that's already in Kaniva, so importing the same file again changes nothing. Past imports are listed under Past item imports.
Stock on the item's page
The item's page starts with its Stock card: Available, On hand and Reserved, with the reorder point and restock quantity under them. Available is on hand minus reserved, and it is the stock the store sells from. Reserved is stock held for storefront and admin orders that haven't been packed yet; it is still on the shelf (see How sales and returns change stock).
On order shows when something is on its way: what's still to come on submitted, sent and part-received purchase orders, plus orders made without a PO (Mark All as Ordered, I Ordered This) not yet received. Draft, cancelled and drop-ship POs don't count. The line under it says how many open orders that is and the earliest Expected date among the POs (see Expected date), or no expected date yet. Click it to open Receiving.
Where it is lists every bin the item is in, its home bin first (marked Home, listed even when empty). Each bin has:
- Count: type how many are really there and Save count. The bin is set to that and the difference is booked as a count.
- +/−: add or take away at that bin (positive adds, negative takes away), with an optional reason, then Save. Kaniva won't take a bin below zero.
- Move: to another bin, with a quantity (blank moves all of it).
Stock that's counted in the total but in no bin shows as Not in a bin: Put in a bin puts it away without changing the total, and Write off removes some of it (lost or damaged) without touching any bin. + Add stock to another bin adds stock at a bin the item isn't in yet. If the item has a bulk storage location, Transfer stock starts a transfer from it.
The item's total, the stock at each bin and a linked product's stock all change together, and each change shows in Recent stock movements with its bin. Scan stock → opens the Scan page, which does the same with a scanner.
Stores with no locations at all get Adjust stock (a quantity and a reason, then Adjust) and Count (set the total to what you counted, then Save count) instead.
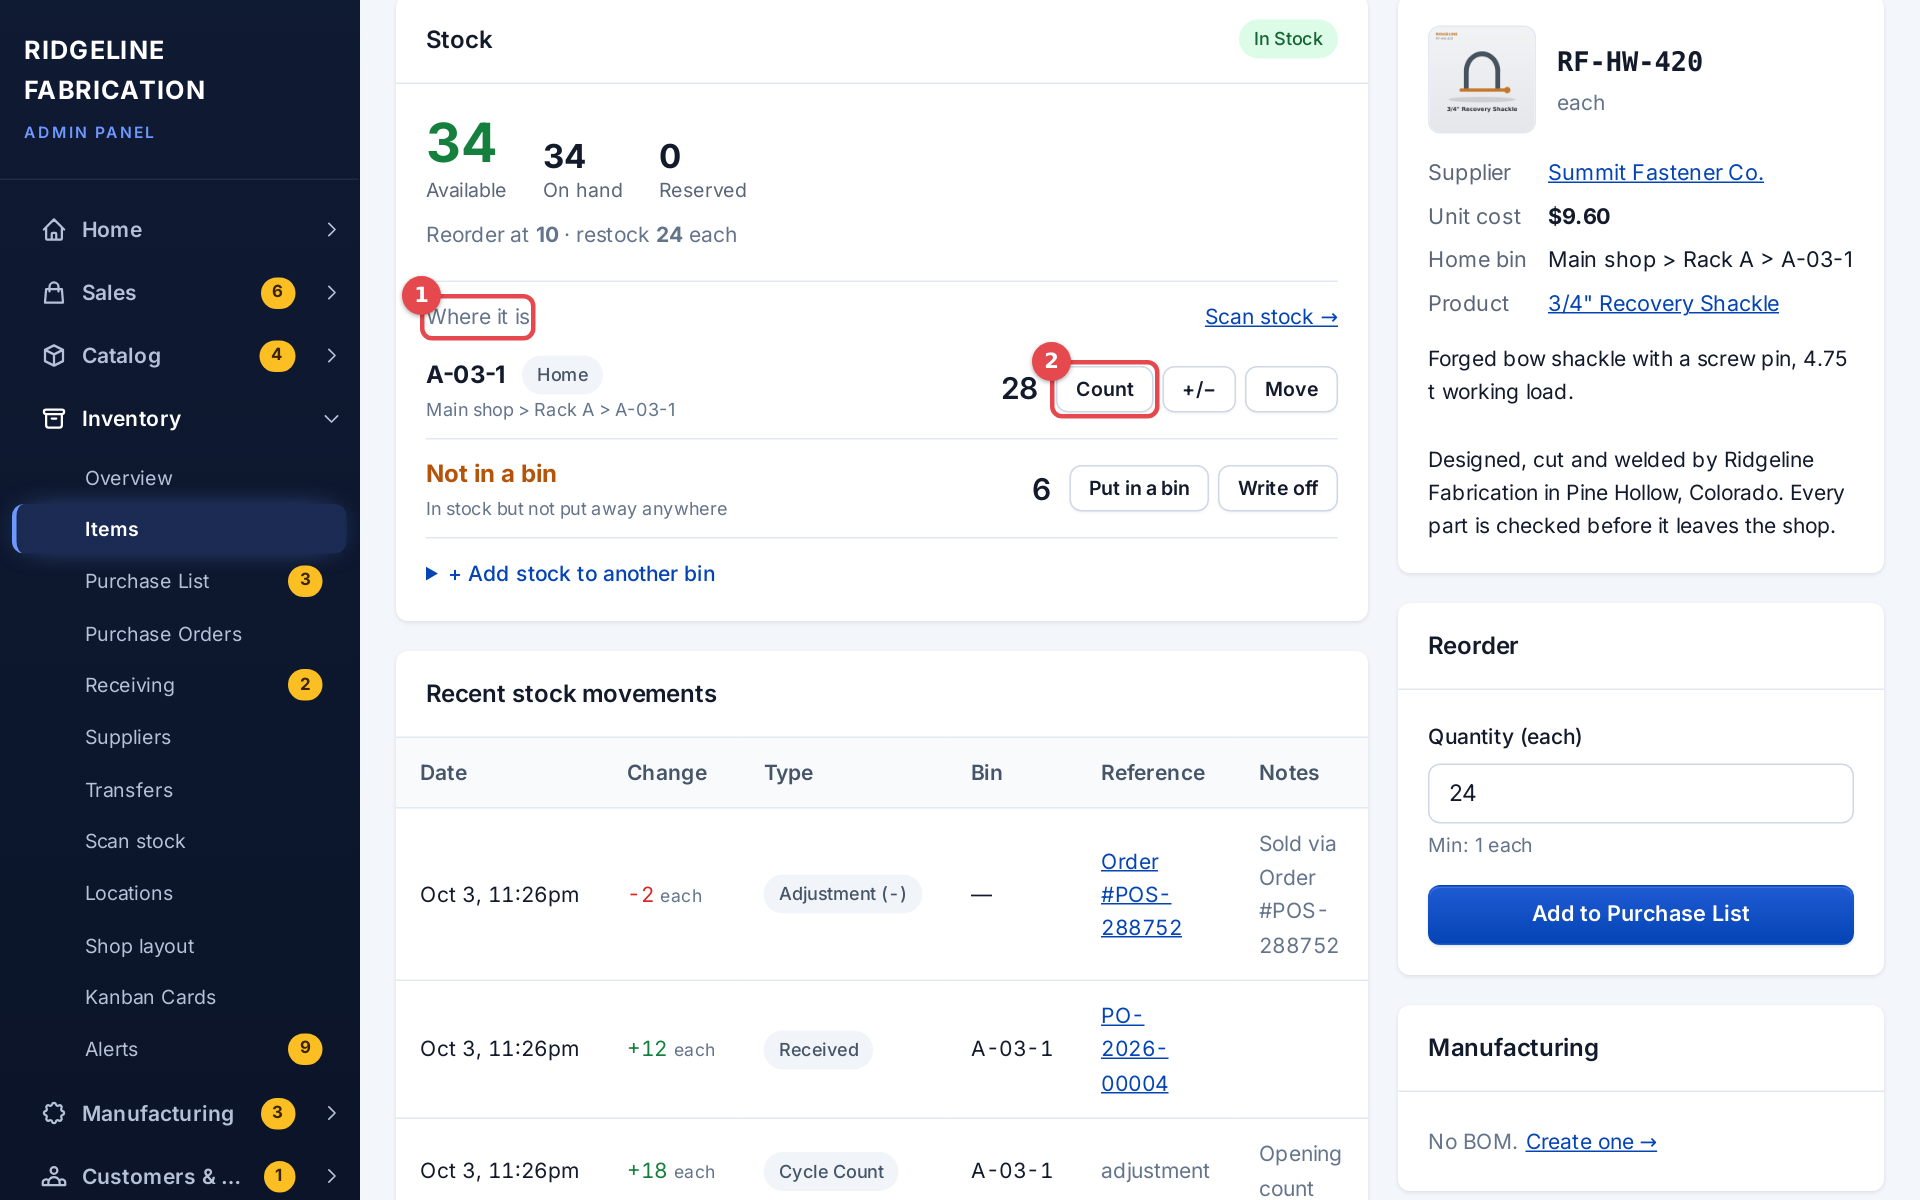 An item's page with its bins under Where it is
How sales and returns change stock
A storefront or admin order holds its stock when it is placed: available drops, so it can't be sold twice, and the units stay on hand in their bins as reserved. Picking on a phone moves the units from their bin to Packing, a staging spot Kaniva makes the first time something is picked; nothing else is ever picked or sold from it. When the order is packed (its items go in a box), or marked shipped or completed without packing, the stock comes off your books: picked units from Packing, anything else from the home bin, then the fullest other bins, then stock that's in no bin. Orders placed before October 11, 2026 took their stock when they were placed, and packing them takes nothing more.
A POS sale hands the goods over at the counter, so it takes its stock at once, and so does a work order using parts. Both take from the home bin first, then the fullest other bins, then stock that's in no bin. A bin never goes below zero.
An order cancelled, failed or refunded before it was packed lets go of its hold, and no bin changes; anything already picked stays at Packing until you move it back to a shelf. Stock that comes back after it left the shelf goes into the home bin: a packed order that restocks, a POS refund that restocks. Stock added by a product import goes there too.
Item labels
Print 3" × 1.5" labels for parts (hardware, raw material, consumables):
- One item: open it and click Print item label.
- Several: on Inventory → Items, click Print item labels to open the full item list with checkboxes. Tick items and choose Print item labels, or Print item labels for all to print everything the search and filters show (up to 200).
The label has the item name, a barcode of its SKU, the SKU in print, a line with the unit and supplier part number (for example "box of 100 · Supplier # 91251A"), and optionally its home bin. Layouts: Standard and Big part number. An item linked to a product uses the product's part number as its SKU, so the same label also rings up at the register. Printing works like product labels: the browser, Download PDF, Send to printer with PrintNode, or a NIIMBOT label printer.
Linking to products
To link an existing item to a product you sell, open the item's Edit page, pick the product in Linked Product and click Update Item. From then on the item and the product share one stock number. Type in the box above the list to find the product. Every product is listed; one already linked to another item says so (linked to item UN-4372). Picking it moves the link here when that other item is the empty one made with the product (nothing in stock, no history), and the empty one is removed. If the other item has stock or history, Kaniva refuses: set that item to Standalone first. A new product whose part number matches an item that isn't linked yet takes that item instead of making a new one. On a new item, use Link to Product (Optional) on the form.
Kanban Cards
A kanban card sits with the part. When the bin runs low, someone pulls the card and scans its QR code to reorder.
Inventory → Kanban Cards lists the cards with their status: Active, Pulled, On Order or Inactive. The status filter picks one of them.
Card types
| Type | Use |
|---|---|
| External (Supplier Order) | Reorder from the supplier |
| Internal (Bulk Transfer) | Refill the bin from your own bulk storage (pick the Bulk Location (Source)) |
| Custom | Anything else; write it in Custom Instructions |
Making a card
Items get a card when created with Auto-generate Kanban card ticked, or when imported. For many items at once, tick them on Inventory → Items and click Make Kanban cards: items that already have a card (Active, Pulled or On Order) are skipped, and the page after lists the new cards with Print these N cards. To make one yourself, click + New Card, pick the **Item *** and **Card Type ***, set the **Primary Location *** and **Restock Quantity *** (how many to order when the card is pulled; it starts at the item's restock quantity), add instructions if you like, and click Create Card.
Printing cards
Print Card (on the card or the item) prints one full-size card from the browser or as a PDF. The Order Qty on it is the card's own Restock Quantity (the item's when the card has none).
Print label (on the card's page, or Label on the Kanban Cards list) prints the card on a label printer instead: the item's name in big letters, a QR code that opens the reorder page (the same as the card's), a barcode of the card number for the Scan box, and a line with the card number, the restock quantity, the bin and the SKU. It uses the same label page as bin labels: 3 × 1.5 in thermal, Send to printer (PrintNode or a Machine Connect PC, set on Settings → Printing), Download PDF, or a NIIMBOT printer with Print to NIIMBOT. Sending or downloading labels counts as printing the card.
Print Batch lists your active cards so you can print many at once:
- Supplier and shelf, rack or area: choosing a rack, floor area or floor takes every card on a shelf or in a bin under it, so you can reprint one rack at a time. The list only offers places that hold cards, and what they sit in.
- Walk order (the default) lists the cards in the order you walk the shop, from your shop layout, the same order pick lists use. A bin on a shelf is walked with its shelf; cards in places that aren't on the layout come after, by location. Card number sorts by KC- number instead.
- Tick the cards you want and click Download PDF of selected for full-size cards (one card pair per page), or Print labels for labels in the same order. With nothing ticked (or everything), Print labels takes every card in the list, up to 200 at a time.
Scanning a card
The card's QR code opens the item's reorder page on any phone camera. Anyone who isn't signed in enters their staff PIN (set up at Settings → Staff & PINs); they don't need an account. The page shows the card's number, the shelf it hangs at and its status. On that page:
- The quantity starts at the card's own Restock Quantity (the item's when the card has none), in the item's purchase units if it has them. Change it with − and +.
- Add to Purchase List adds it to the Purchase List for the next purchase order, and the card shows Pulled.
- I Ordered This (signed-in staff only) records that you ordered it, so it shows up on Inventory → Receiving to check in when it arrives. The card shows On Order.
A card asks once. Scanning it again while it's Pulled or On Order adds nothing and says so, and neither does scanning a card whose item is already on the list (from + Purchase List or a stock alert): the card is attached to that line instead. If the item is already on an open purchase order, the scan adds nothing and says which PO it's on; the card waits with that PO (On Order) and comes back when it's received. An item ordered without a PO works the same way. When the PO is sent the card shows On Order; it goes back to Active when the PO is fully received, so a part delivery leaves it waiting. Hang it back at its shelf then. Orders without a PO: a card ordered with I Ordered This or Mark All as Ordered stays On Order until the whole quantity is received on Inventory → Receiving (or the order is cancelled), and the message after receiving says which card to hang back and where.
On the card's own page:
- Mark as Pulled does what a scan does: it puts the card on the Purchase List at its quantity, and the card shows Pulled. Clicking it again adds nothing.
- Open Purchase List shows where a pulled card is waiting. A card pulled before it was listed shows Add to Purchase List instead.
- Reset to Active puts a pulled card back.
- Status Timeline shows when the card was made, printed and pulled, its Purchase List line, and the purchase orders and orders without a PO that carried it, with links.
Stock Alerts
Kaniva raises an alert when an item's stock changes and falls to its reorder point (Low Stock) or to zero (Out of Stock). When stock is back above the reorder point, the alert resolves itself.
Inventory → Alerts lists them. Filter by status, type (Low Stock, Out of Stock, Overdue PO, Reorder Point) and level. For each alert:
- Ack marks it seen.
- Resolve closes it.
- Order opens a page for the item that shows whether it's already on the purchase list or on order (with a link to the PO). Add to purchase list there adds it at its restock quantity and shows the list. The alert email's button opens the same page.
- WO (items with a BOM) starts a work order to make more.
To put every low item on the purchase list at once, use Add low-stock items on Inventory → Purchase List (see Purchasing).
Run Alert Check checks every item now. Acknowledge All Active and Resolve All Acknowledged clear the list in one go. Set an item's reorder point on its Edit page (Trigger Level).
Internal Transfers
A transfer moves stock of one item from one location to another, for example from bulk storage to the home bin.
- Open Inventory → Transfers and click + New Transfer.
- Pick the **Item ***, the **From Location *** and **To Location ***, and the **Quantity ***.
- Leave Start transfer immediately ticked, or untick it to create the transfer as Pending.
- Click Create Transfer.
On the transfer's page, Start Transfer marks it In Progress and Complete Transfer moves the stock. Cancel Transfer stops it. Statuses are Pending, In Progress, Completed and Cancelled.
A transfer of more than the origin holds is refused, and nothing moves. To move stock between bins without a transfer record, use Move on the item's page.